In the first post on Sente, Sente for PDF Management on the Mac and iPad (1): Capturing and Organizing PDFs, I showed you how to make PDF and bibliographic libraries using Sente, and made some suggestions for how to set up your library bundles, namely so that they look like this. In previous posts, I introduced Digital Workflows for Academic Research for Mac, and discussed the basics of managing PDF chaos. In this post, I will continue exploring more of the main capturing functionalities of Sente, starting off by re-capping ways to add files and entries, demonstrate proper editing of metadata using a sample PDF, then showing you how to add items to libraries and capture PDFs in Sente’s internal browser. I will conclude this post with an introduction to some of Sente’s basic organization features: reference panel tags, hierarchical “quick tags,” star ratings, and statuses.
The next post–Sente for PDF Management on the Mac and iPad (3): Quick Add, Zotero Workflow, and Automated (Re)searching  — will mostly conclude your understanding of Sente’s organizational features, then transition to a demonstration of how to use the software both for strictly building up bibliographies without attachments (i.e. for ad hoc projects, for re-assembling and modifying bibliographies for publication, etc.), and quick adding reference items. I will also show you how to import Endnote, Zotero, and other bibliography formats (i.e. BiBTeX). I will then briefly show how to use Sente’s automated search and research functions, like the Z39.50 and SRU plugin to automate research of hundreds of academic library catalogs, and explore how this can be used in conjunction with Sente’s “Smart Collections” feature.
It’s been a hiatus in posting, but there’s been a lot going on behind the scenes. For those of you interested in what’s currently planned and in production for the rest of the series, I’ve put together a tentative road map of posts to expect in the days and weeks ahead:
- Caveat Emptor! Data, Privacy, Price, and Purpose in your Digital Workflow (or Sente vs. Mendeley vs. Zotero vs. and others)
- Sente for PDF Management on the Mac and iPad (3): Quick Add, Zotero Workflow, and Automated (Re)searching
- Sente for PDF Management on the Mac and iPad (4): Reading/Annotation in Sente at home and on the go, plus Power Note Taking (#tagging) with Sente Assistant
- Sente for PDF Management on the Mac and iPad (5): Bibliography and Cite/Scan with Word/Mellel/Scrivener/Plain Text (Multimarkdown)
- OPML, Rich Text, and Hierarchical Structure: Moving data between Sente, DEVONthink, Scrivener, and Outline/Mind Map Applications
- DEVONthink (1): Introduction to Databases and Information Capture/Management
- DEVONthink (2): Key Practical Applications and Uses within the Academic Digital Workflow
I have planned to conclude the series with a couple of posts on using Scrivener, as well as some discussion of ancillary apps for iPhone and iPad that make scanning and information capture easier, especially in bridging analog/print and digital media through applications like DEVONthink, Dropbox, and Evernote.
In any case, for those of you waiting for the iPad part of the Sente discussion, I have delayed it for two reasons:
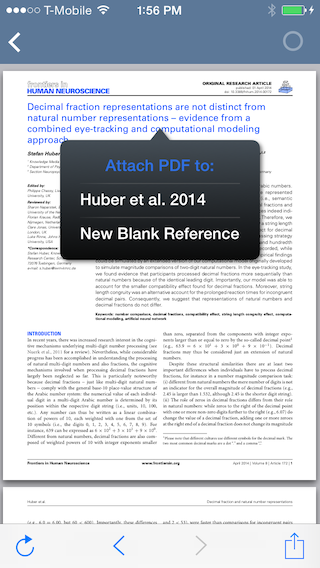 1) First, because the Sente developers are on the cusp of releasing a version natively upgraded for the latest version of Apple iOS (iOS 7), pictured to the left. This is a significant upgrade, as the interface will be changing a bit and it will also include sync with an iPhone version of the Sente app.
2) Secondly, because the most useful features of the Sente iPad application– its annotation and reading interface–are most efficiently grasped after exploring the use and functionality of those same features on the desktop application. Moreover, as the iPad application has several of the same organizational features as the Mac desktop version (besides reading an annotation), I thought it would be better to finish that side of things first so that users are acclimated to it.
Re-cap: Adding PDF attachment references to Sente Libraries
We previously explored how to drag PDFs into the library and capture their metadata, pairing them to a reference inside your library. To re-cap: Sente has a built in automated feature that attempts to pair the metadata to references and attachments using the DOI (Digital Object Identifier) number, if possible, as I indicated previously. For those of us not predominantly using electronic scientific journals (and especially for those of us that have lots of ad hoc OCRed scans of various exceprted print books in our libraries), this does not usually work, and we will have to import the metadata ourselves.
I previously did discuss some of the drawbacks of various kinds of metadata, particularly from Google, and insisted that it is always worth while to double check the fields of your entries, and demonstrated some shortcomings. In general, I think the best way to add new items to Sente with generally good metadata information capture when the automatic DOI import does not work is to use either OCLC – Worldcat or some of Sente’s selected academic libraries. In Sente, Stanford University Libraries–for reasons unbeknownst to me (though I’m tempted to think its because of the latter’s location in Silicon Valley)–tends to have very clean import and population of metadata fields, while Worldcat can range from excellent to not so good.
 Because Worldcat OCLC grew into accepted universal cataloging entity as a cooperative effort over a long period of time, some differences in metadata quality appear to stem from the fact that in OCLC, historically, the initial (or master record) of a reference was created by the first library to submit the record for a particular reference or material. Later entries of this, for example, at subsequent institutions, libraries, and collections, would then “dock” their records on to the previous, master entry. Therefore, depending on the standards or cataloging quality of the original entry, and subsequent variations, then, Worldcat-OCLC data today ranges from very clean and comprehensive to sporadically not so clean. This is not meant to be a criticism of Worldcat, but just an explanation as to the genesis of the metadata and why there is some variation. That said, Worldcat-OCLC metadata tends to be the best and most comprehensive available, and as I continue to repeat, even under the best conditions, you will often have to develop a habit of “best metadata practices,” tailored not only to the kinds of bibliographies you want to generate and use in professional capacities (style, function, audience etc.), but to the level of standards of clean record keeping you want for yourself. Since Sente is also a bibliographic generator and citation management application, I urge you to think strategically as you enter your metadata about how the item would want to look in a real bibliography–this will save you time and pain later. No matter which software you use, this is a sine qua non of a good digital workflow!
Sente’s two metadata grabbing modes
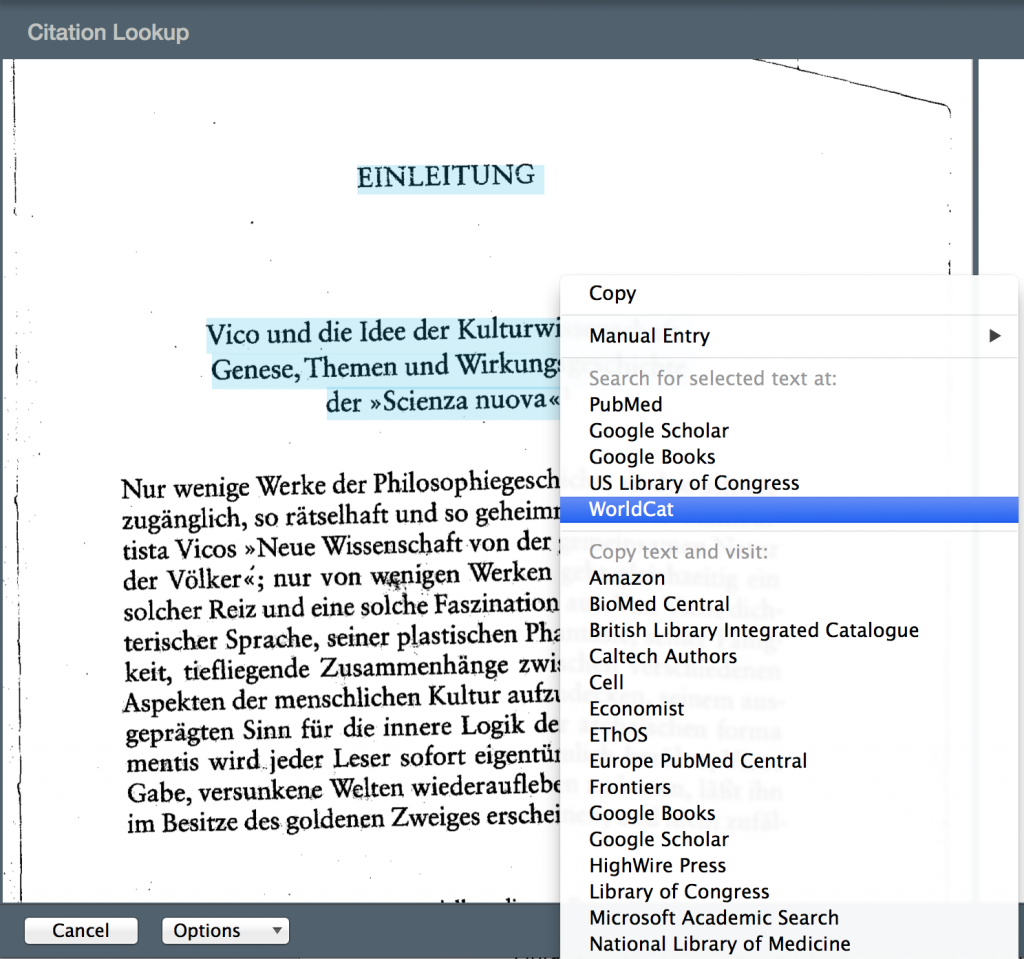
To re-cap, then, and assuming you’ve OCRed your PDF using Acrobat or Abby Finereader, Sente has two metadata grabbing modes when you drag in a PDF into your library. One option is to highlight a portion of text and search for the selected text automatically in PubMed, Google Scholar, Google Books, US Library of Congress, or Worldcat. The other option, as shown below, will automatically copy the text selected and open the option you click. You will then have to manually paste (Command ⌘ + V) into the search box to find relevant targets to click and suck in metadata.
In this example, I’ve selected a PDF from a German/Italian translation project I had worked on. Now this is perfect example of a case in which getting the right metadata in your library still requires a lot of active thought and work. Sente, as with applications like Zotero, can give the impression of abracadabraism: it’s sort of true, but not really.
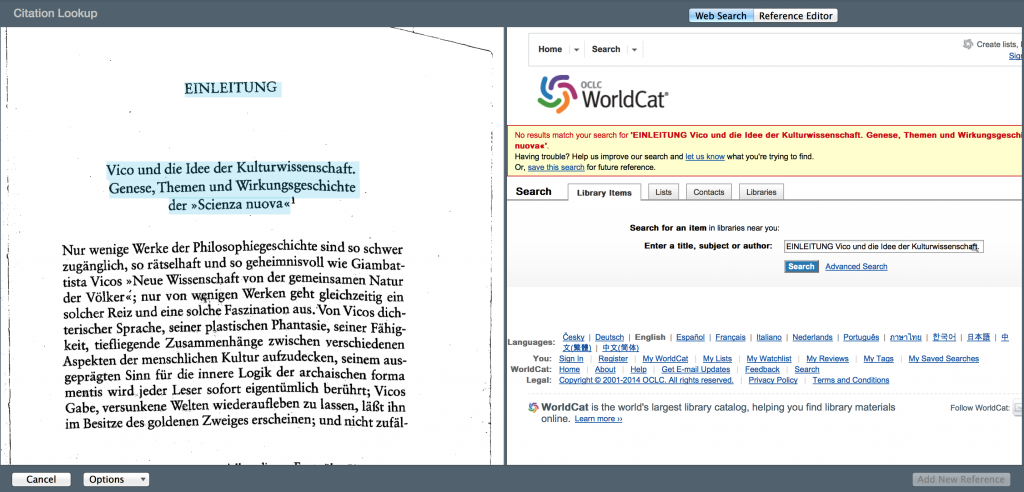
In this example, I choose Worldcat.
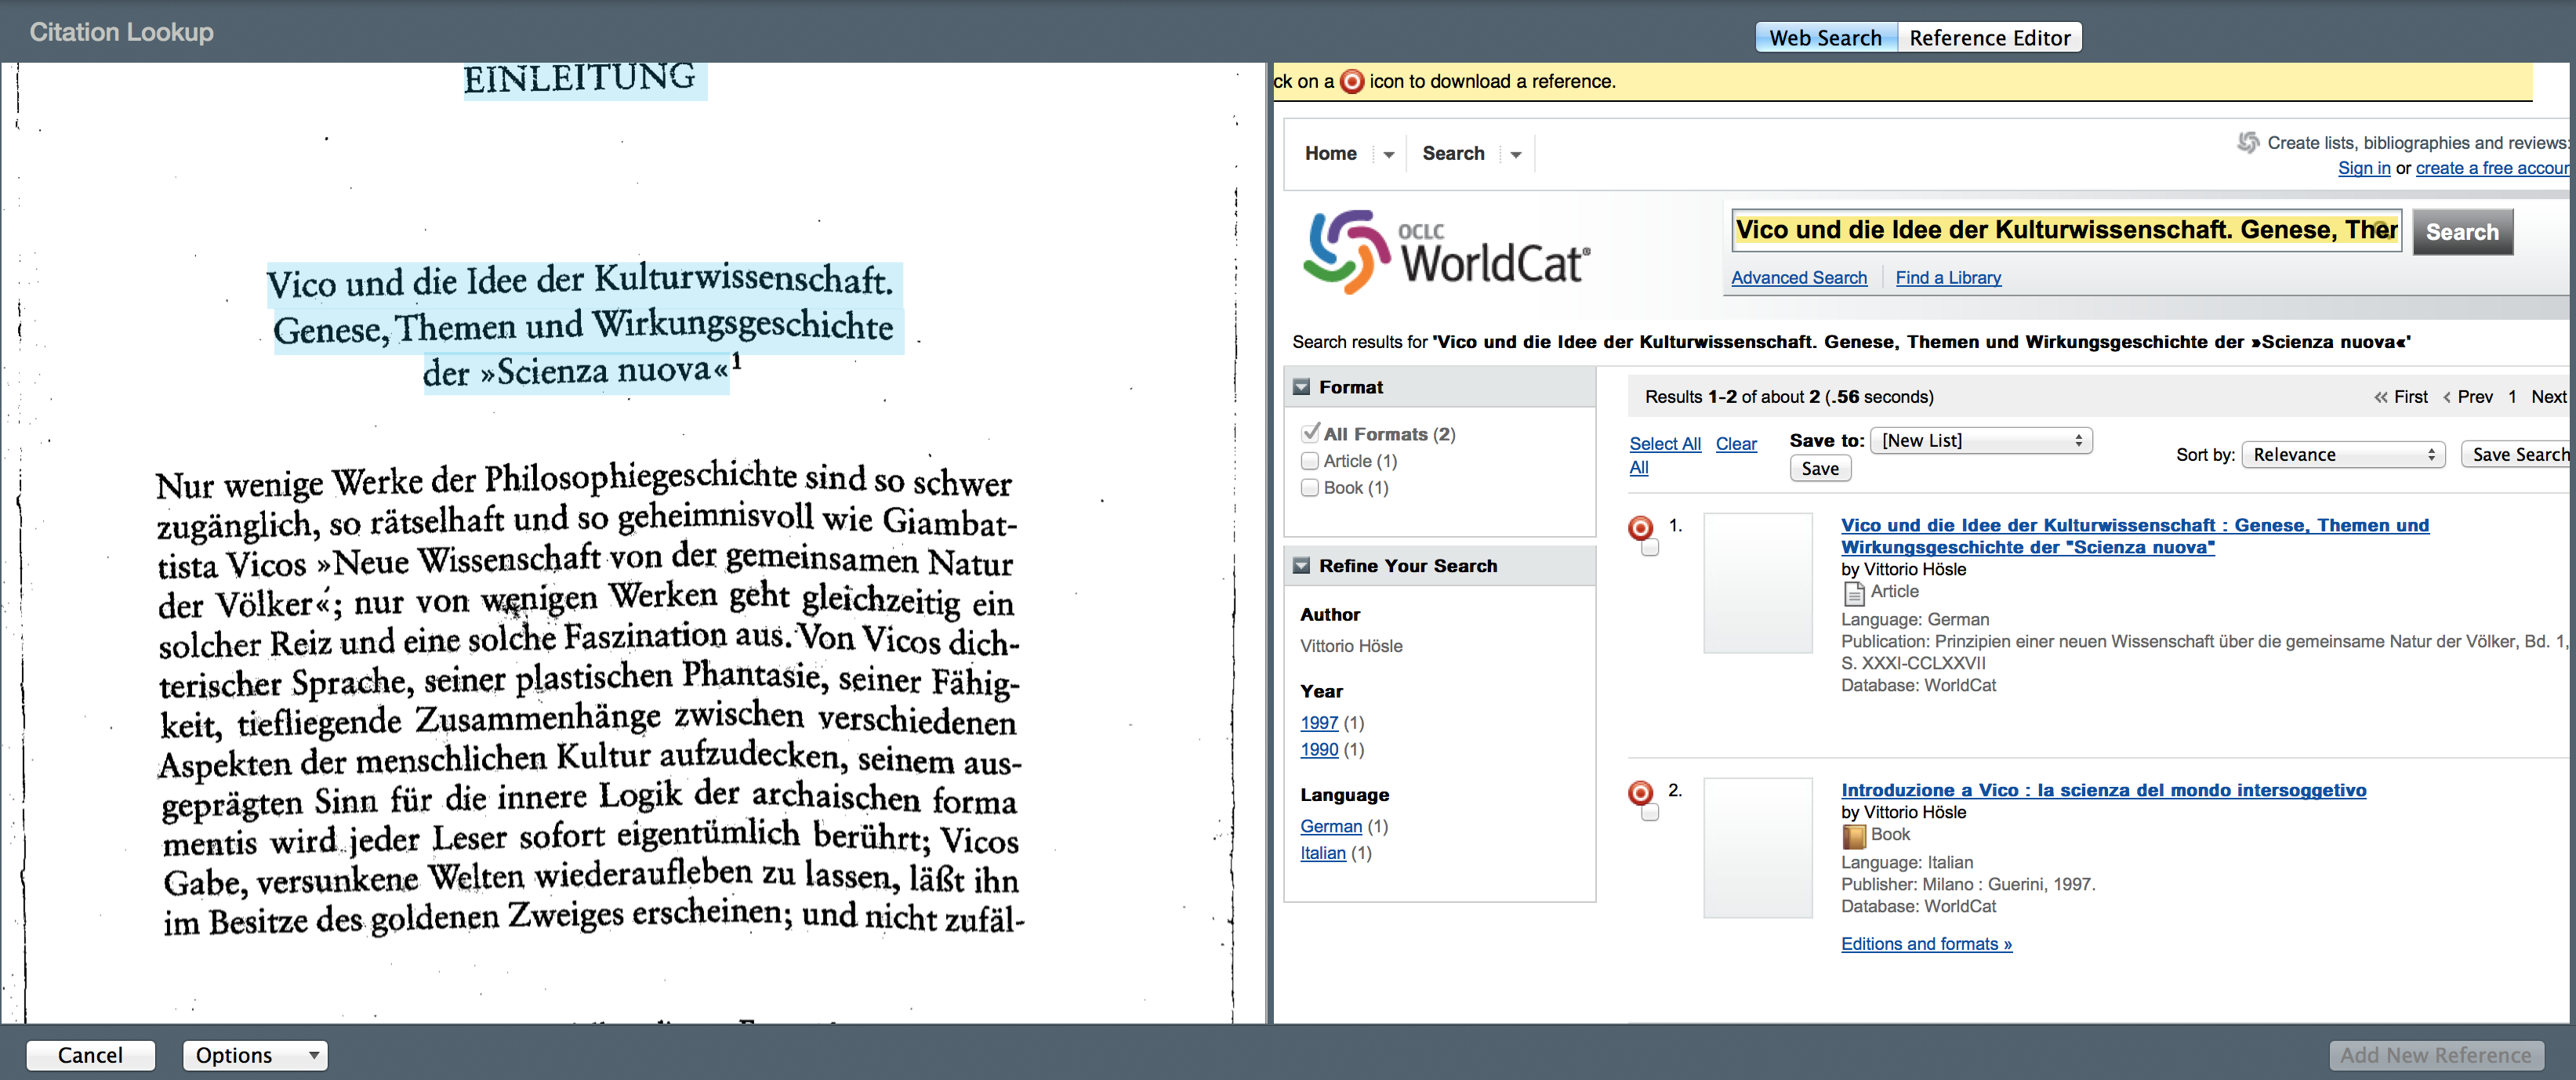
We see that the result initially is disappointing, albeit this is an arcane excerpt from a German published print volume. Now, what to do? Enter it manually? Alas, sometimes you’ll need to modify your search. Here I simply delete the word “Einleitung,” and search again. The window on the right is going to function like an internet browser window. You can ust click inside and delete the word “Einleitung” or add the author’s name. In my experience, sometimes you can find the record just by tinkering, which I do:
When I click search again: bam, Worldcat finds my entry. I’m impressed!
Once I click the target, which in Sente is the button for gathering the metadata on a particular entry, the software will now get it for me. I’m done right? Wrong.
Among other incomplete portions in this entry, in my bibliography this would have to be cited as a book chapter. To be it clear, a “book chapter” is a category meaningful, namely, for being a section or except from a larger work–it need not be a real “chapter”, but would be an item that would appear in your bibliography with cited pages and usually an section title with “in” in relation to a fuller citation. Like so (formatted for APA 6):
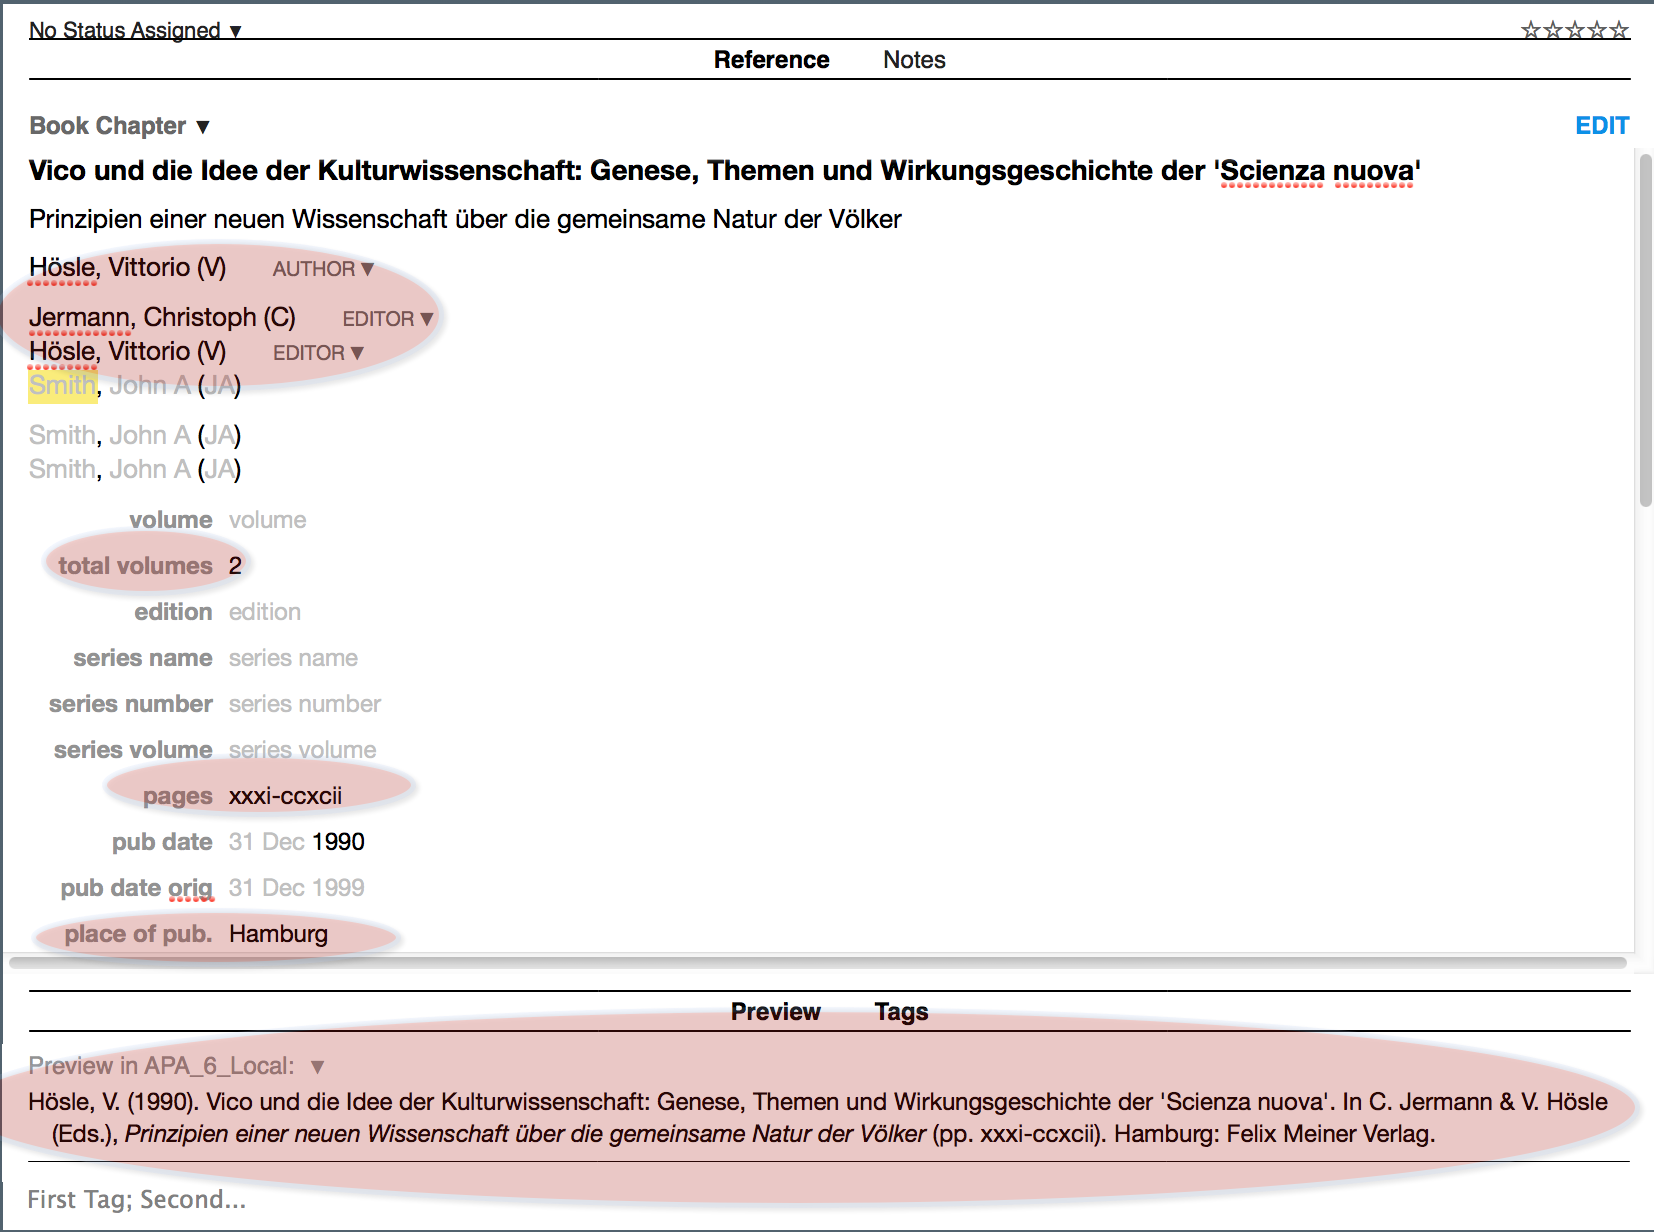
Hösle, V. (1990). Vico und die Idee der Kulturwissenschaft: Genese, Themen und Wirkungsgeschichte der ‘Scienza nuova’. In C. Jermann & V. Hösle (Eds.), Prinzipien einer neuen Wissenschaft über die gemeinsame Natur der Völker (pp. xxxi-ccxcii). Hamburg: Felix Meiner Verlag.
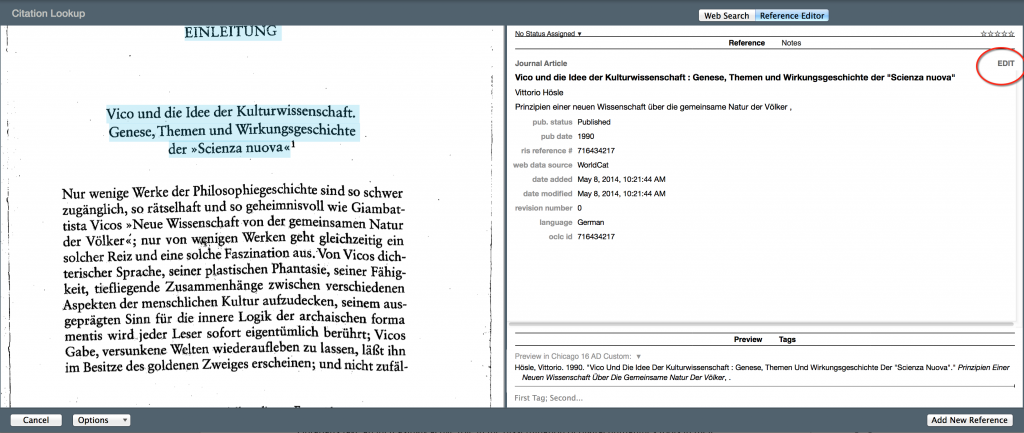
However, looking at the initial import there are several problems. I want to show you how to get from what the bib preview looks like below, which is incorrect, to something more correct, like above.
The preview window is so important because it lets you see how your bibliographical citation will look. I need to make some modifications, as the citation is clearly incorrect as it stands. I click the edit button in the top right corner.
What to do? First, I change it from “Journal Article” to “Book Chapter.” Also, note here, that this particular PDF is excerpted from a series of pages “xxxi-ccxcii”, from volume one of a two volume publication. Depending on the citation style you are using, there could be variation (i.e. it may not require some of this information), but you want the data entered correctly, and so I fill this all in, based on my preference for and use of either APA or Chicago 15-16 AD or Notes/Bibliography. Here, I also know from working with this text that Christoph Jermann and Vittorio Hösle both edited and translated this volume. So, although Worldcat correctly populated the title of the article (in this case chapter/excerpt to be cited), it does not automatically populate this information. It also leaves out the number of volumes, the pages, publisher name, city of publication. Whew!
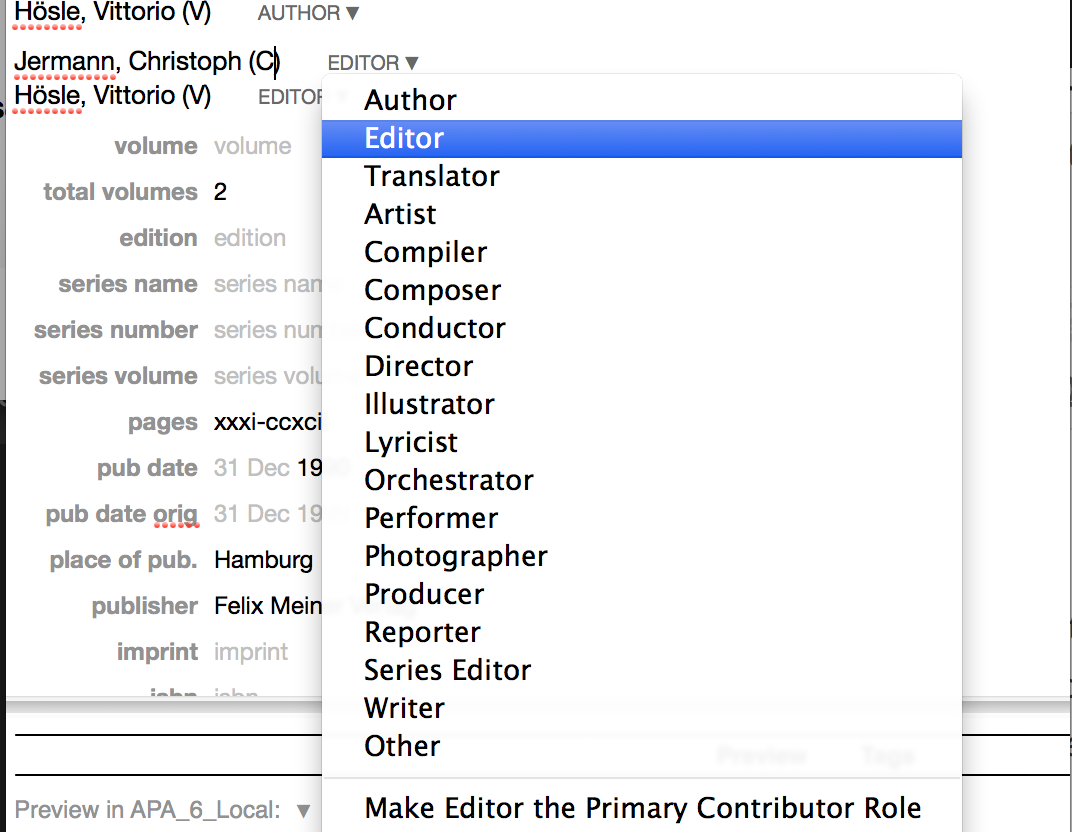
Also, Vittorio remains the author of the section/chapter, but since it is “in” the two volume published work Prinzipien einer neuen Wissenschaft über die gemeinsame Natur der Völker, we must manually populate this information. So, here I add Vittorio Hösle and Christoph Jermann as editors, by clicking on the arrow next to their names and selecting editor for each (this same function works if you are dealing with an editor or translator, or even editors and translators, which requires a manual set up category, or correction later). I also add the correct city of publication and publisher, and set it up so that our bibliography entries will be correct, regardless of the biblio style we opt for.
Nota bene: In Sente, it’s important that you press enter after entering the name and middle name (or initial), if any, in the author first name box, such that the initial populates and visibly goes into the parentheses as pictured above.
This is also important because if you don’t enter the same exact author name every time or don’t make sure the initial appears next to the name in parentheses, then you may end up with duplicate entries for the same author because one has registered the name field correctly but the other has not. Don’t worry about this too much, but in case you notice an error in your bibliography, this might be why.
When I’m done, I click edit again and change the style to the one I want this time, APA 6, and it’s finally formatted in the citation preview the way it should look, but note that Worldcat–a generally good source of metadata, did not automatically set this up, and does so perfectly with full automation only RARELY:
Our citation will now be correct in when we use a citation key to cite this work or want to generate a complete correctly formatted bibliography.
You can always access the “Bibliography Preview” from Sente’s “Window” menu.
Adding files using Sente’s Internal browser
Sente also has an internal browser that allows you to add PDFs to your library from internal databases you connect to through the institutional portal, or from any internet site. Here I’m going to show you how to use Sente to access and store your research from CLIO and accessible through the Columbia University Libraries.
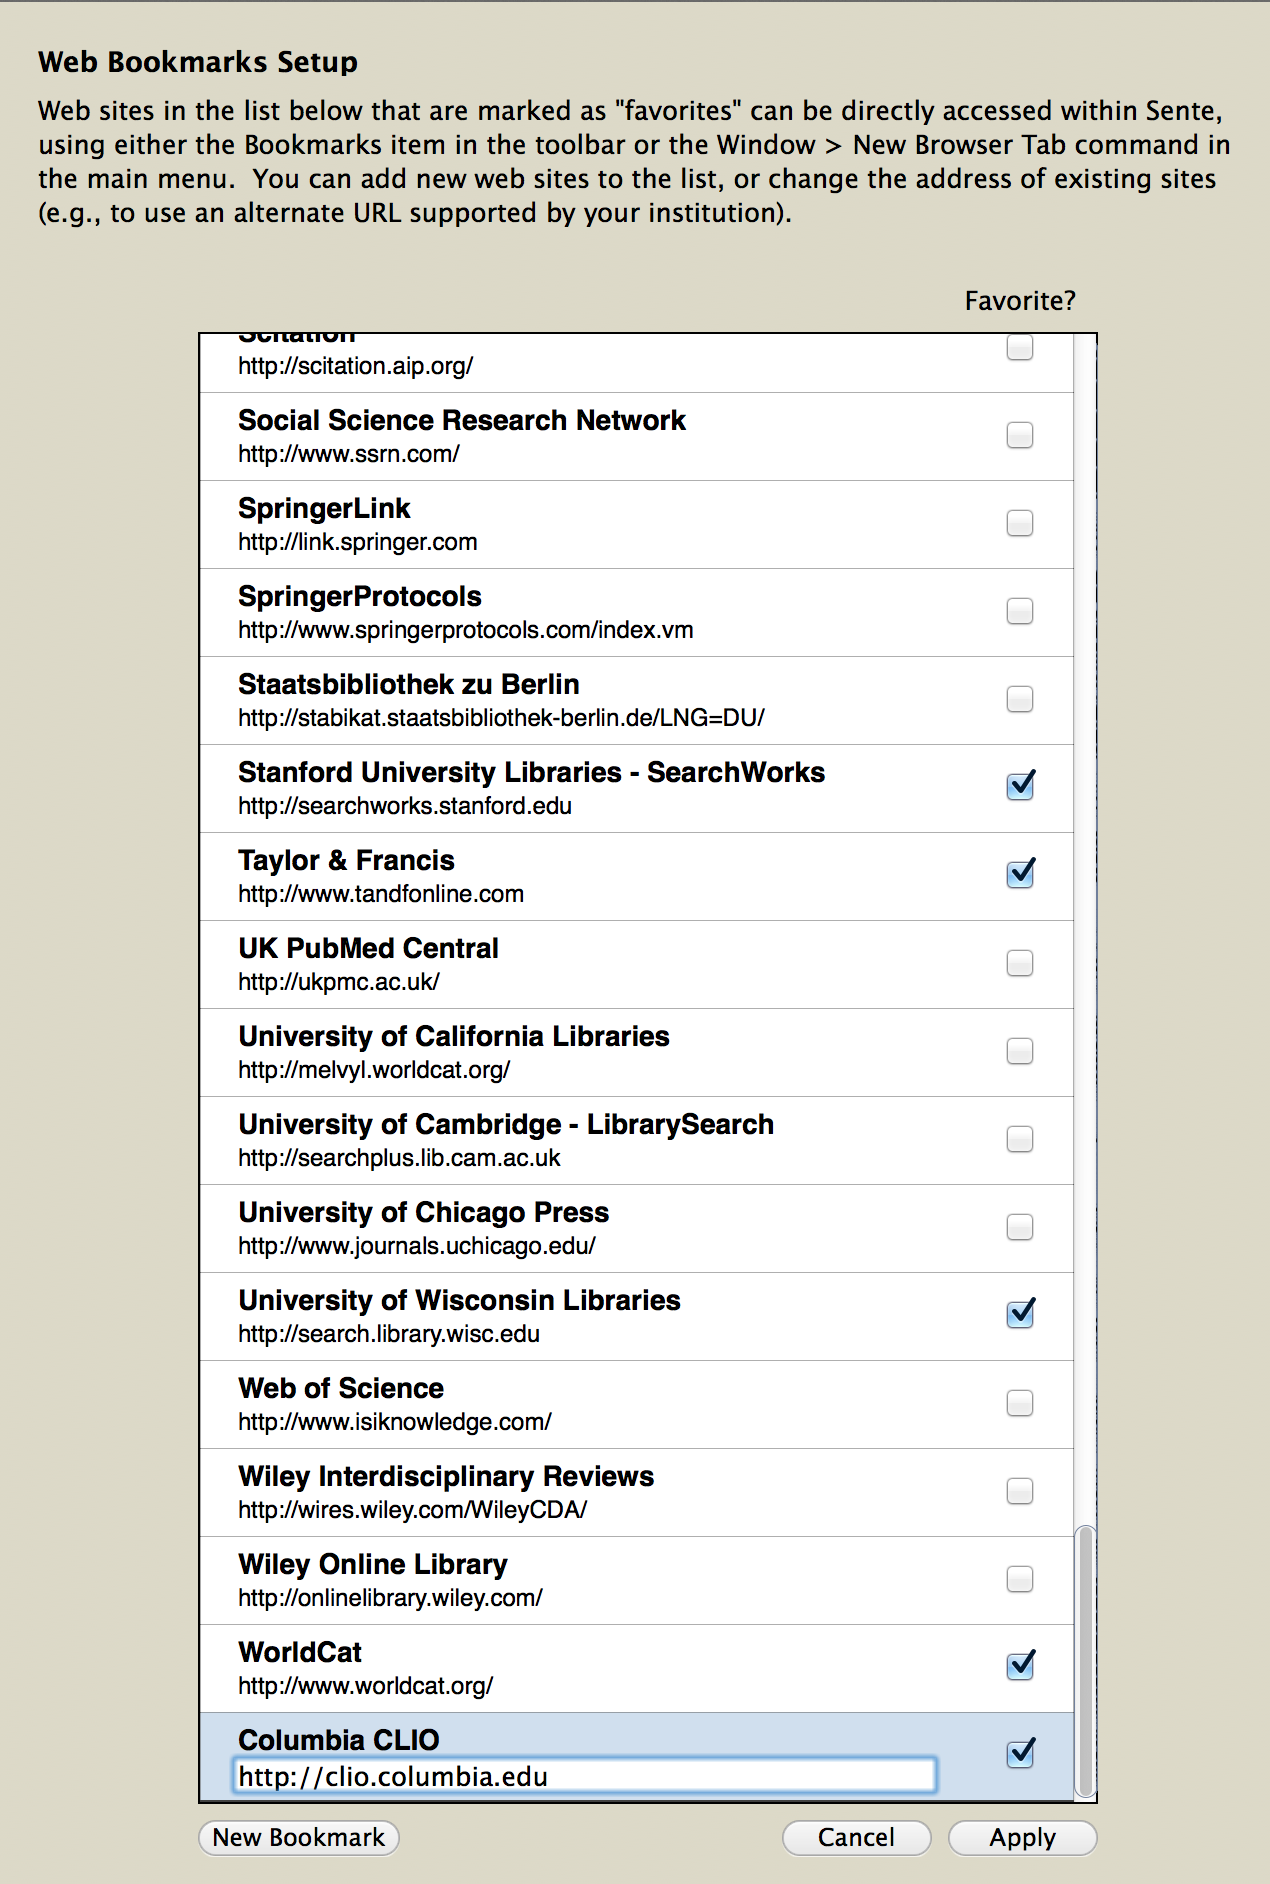
The first thing to do is to set up a new bookmark for CLIO. To set up a bookmark in the Sente browser for Columbia’s CLIO, first go to “Web Book Marks Setup” in the left hand library setup bar.
Click “New Bookmark,” add the URL, and make a label, “Columbia CLIO.” Click apply.
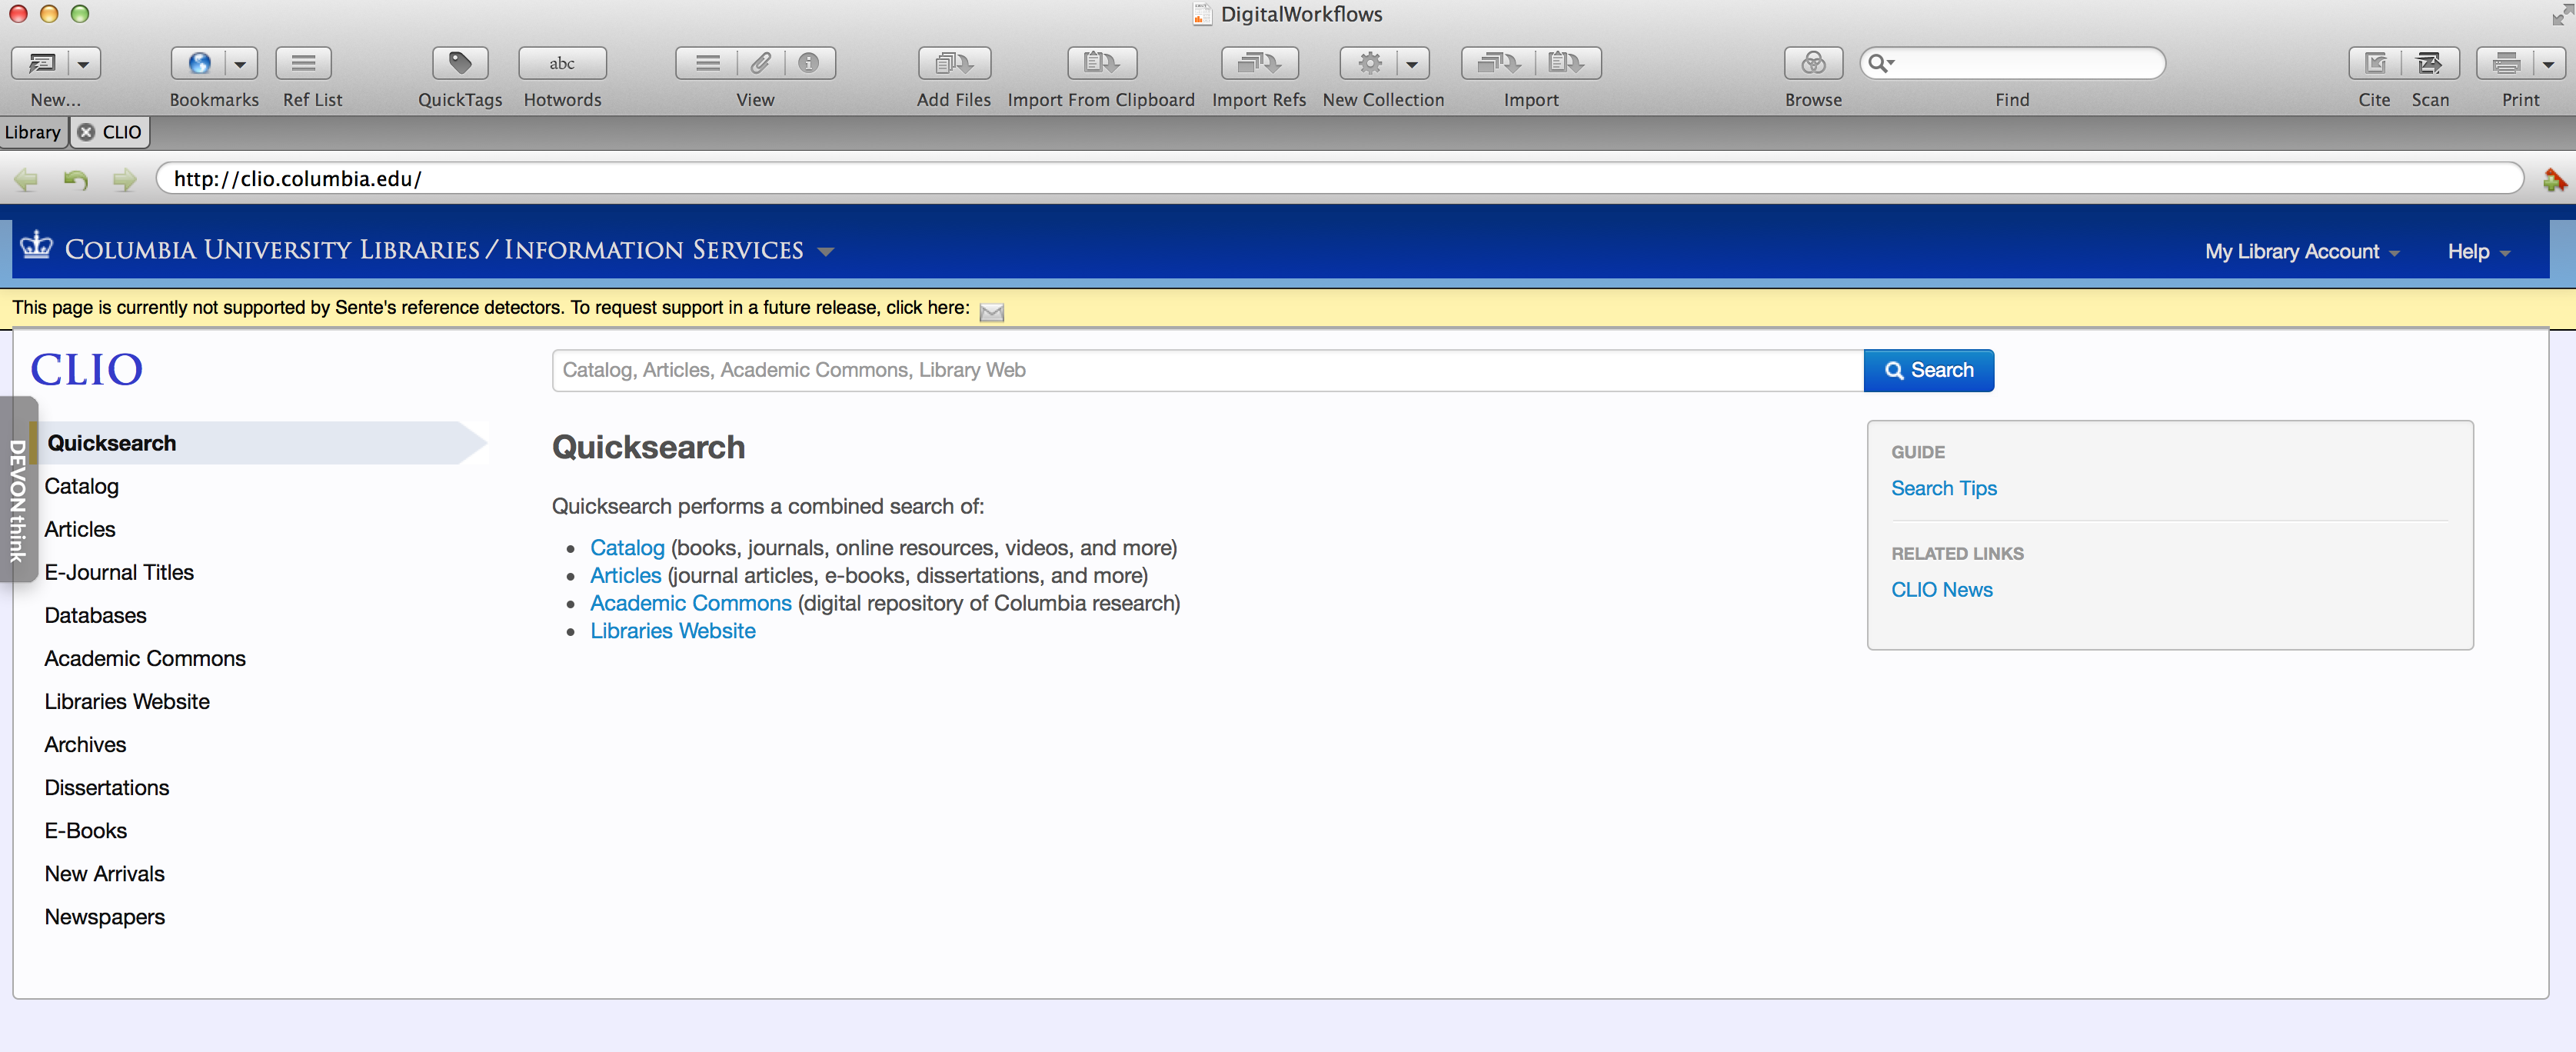
We now see the Columbia CLIO portal in the bookmarks menu in Sente, along with other catalogs and resources. I add CLIO for Columbia because that’s where we will be able to log in with our institutional id to the subscription databases we use for our research at Butler. The rest of this will look very familiar. Click “Columbia CLIO” to launch a browser window. As you see in the picture (above) you can also open blank tabs:
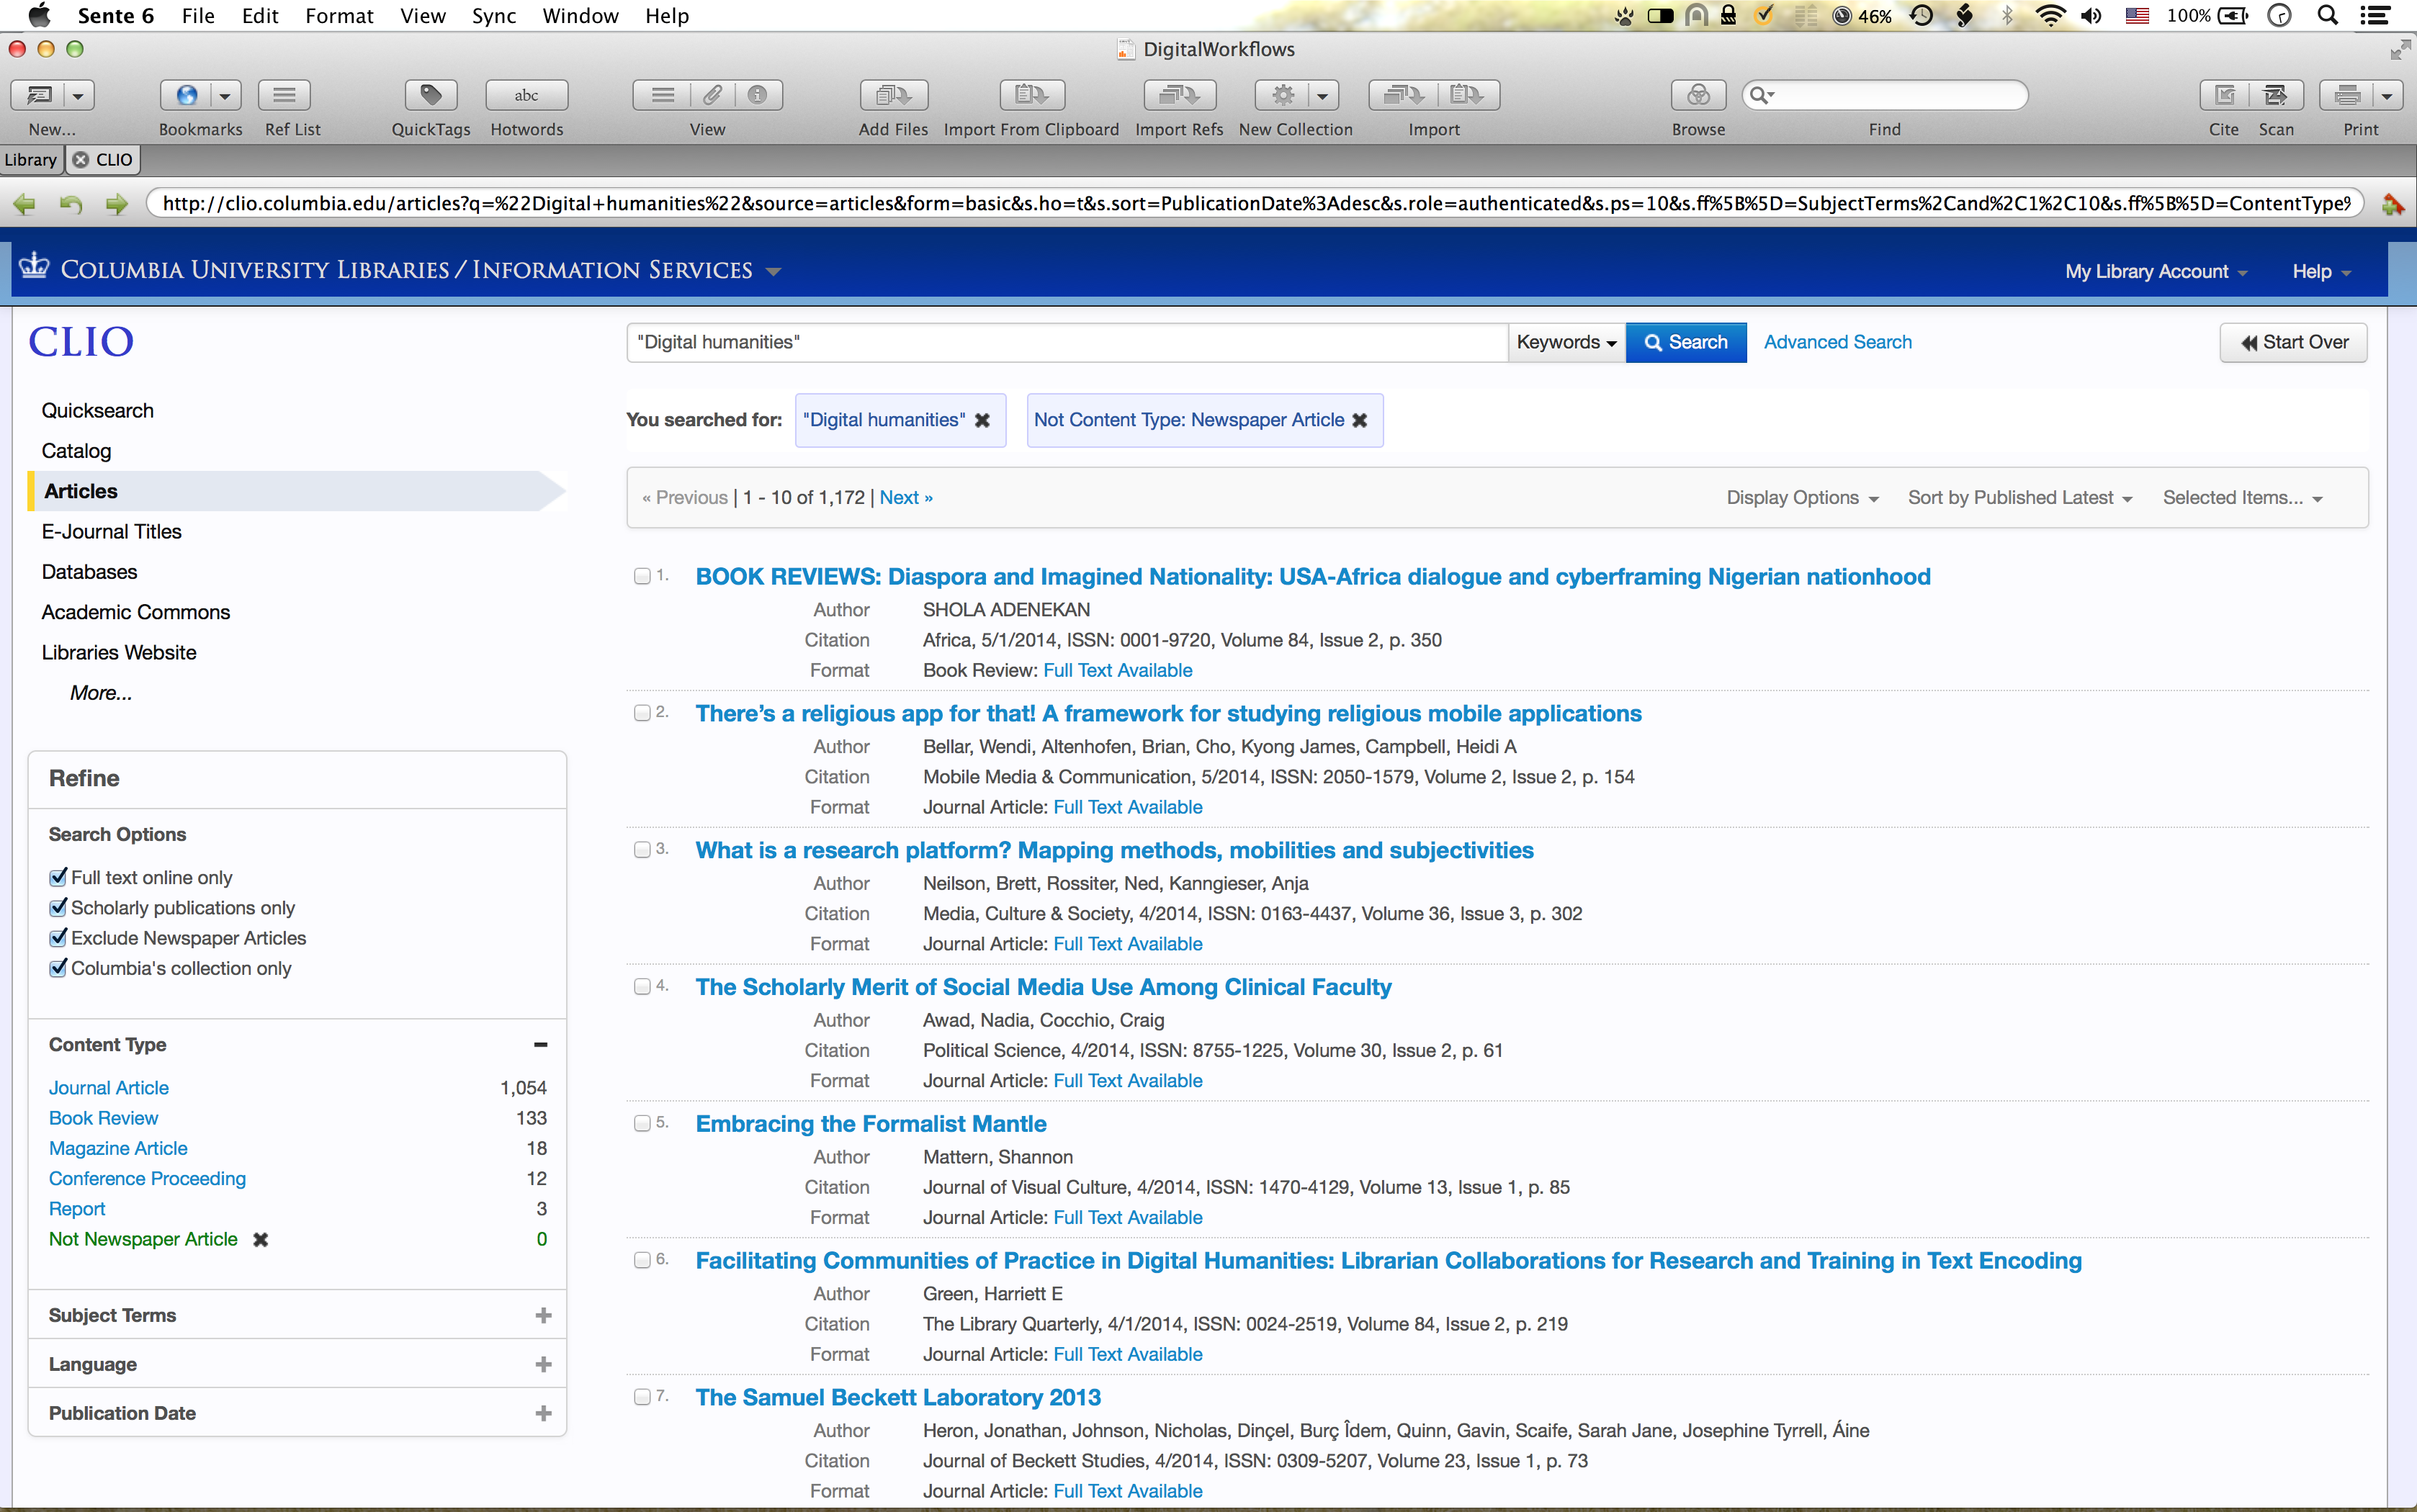
Using CLIO as normal, I find an article I’d like to download:
Green, H. E. (2014). Facilitating Communities of Practice in Digital Humanities: Librarian Collaborations for Research and Training in Text Encoding. doi:10.1086/67533
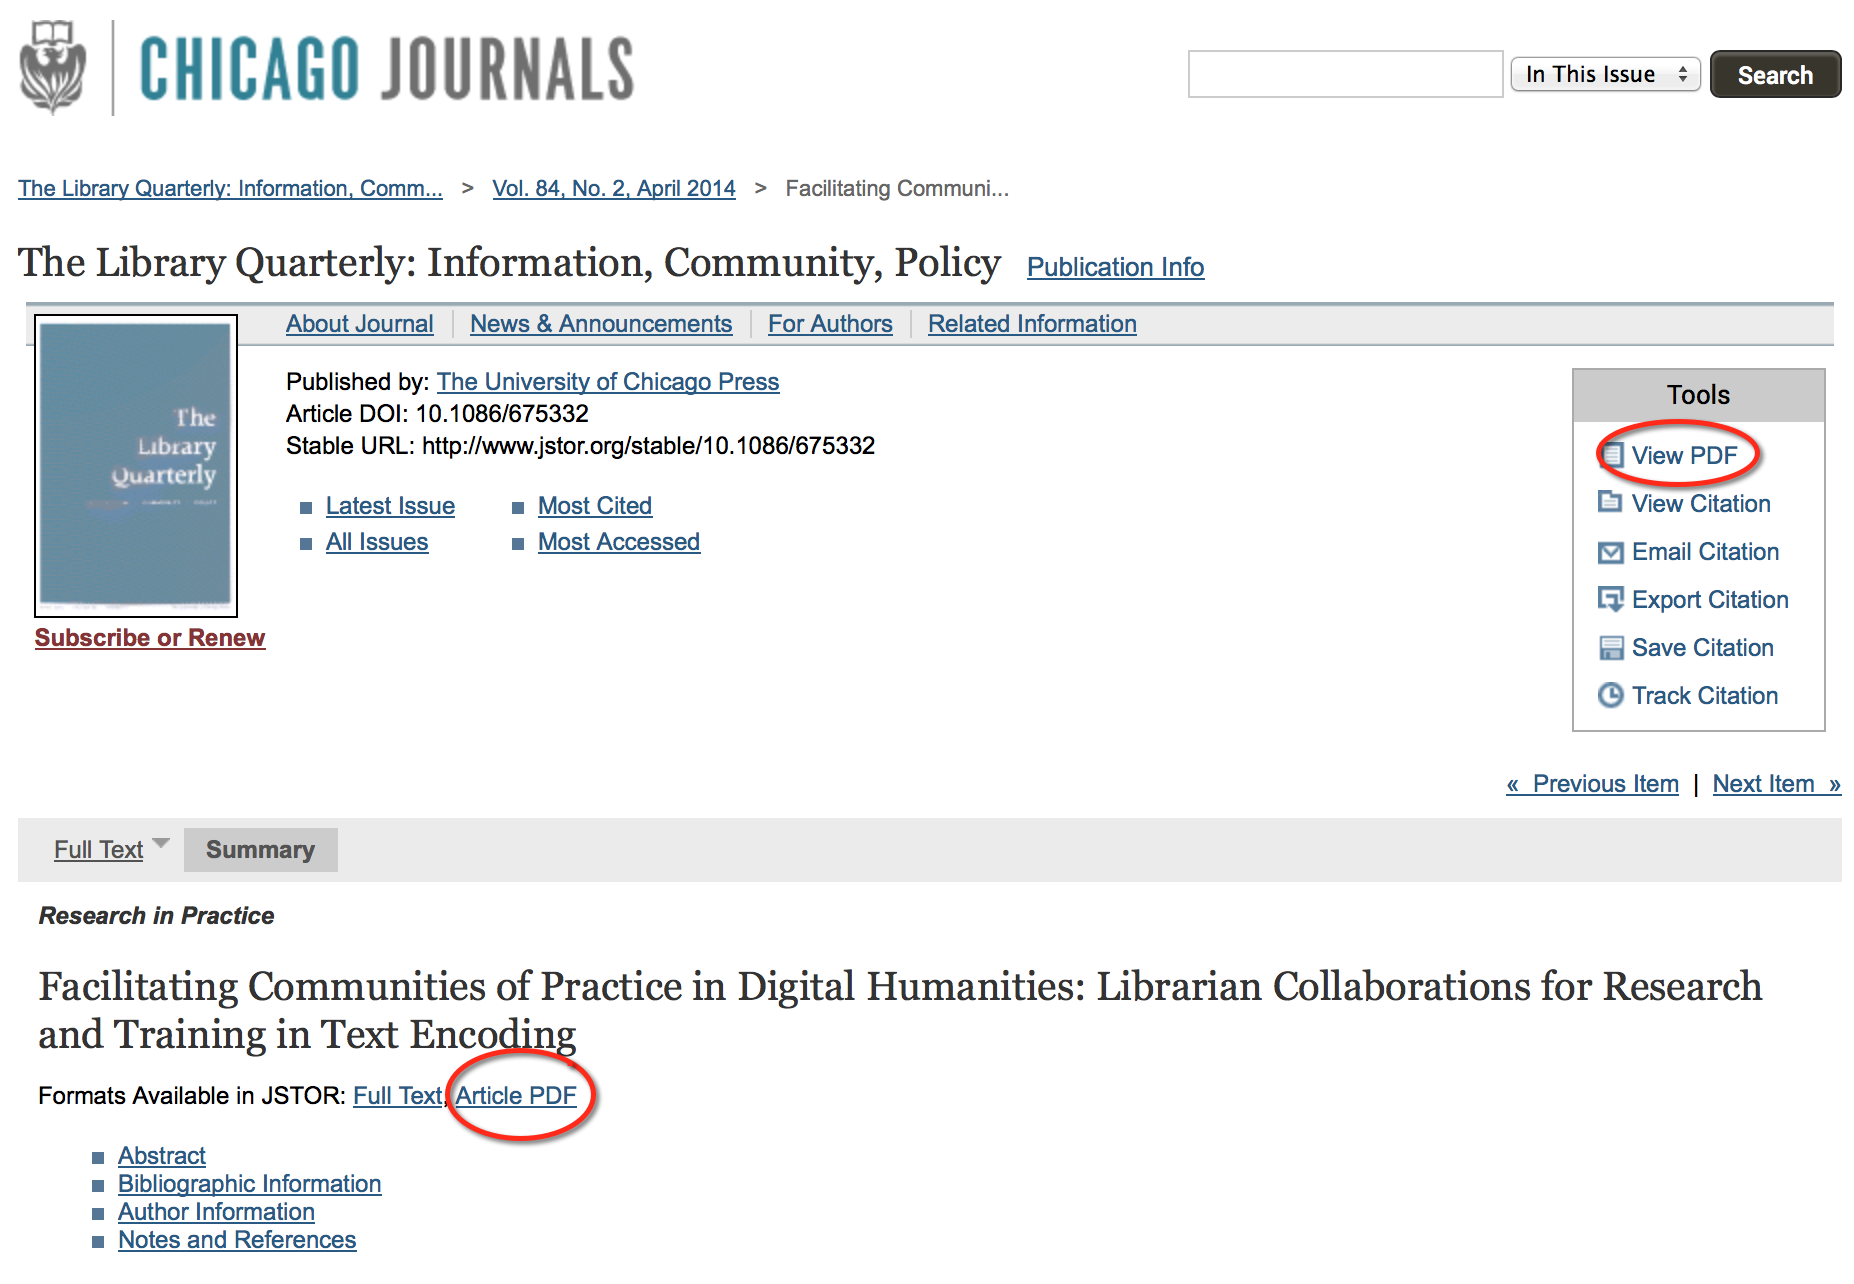
When I click on the entry, I navigate to the page inside JSTOR/Chicago Journals:
You have two places you might think you can get the PDF. Honestly sometimes it’s one or the other, sometimes (as in this case) clicking either of them works, or only one. Assuming you’ve signed in with your institutional credentials, you’ll be given the following JSTOR terms:
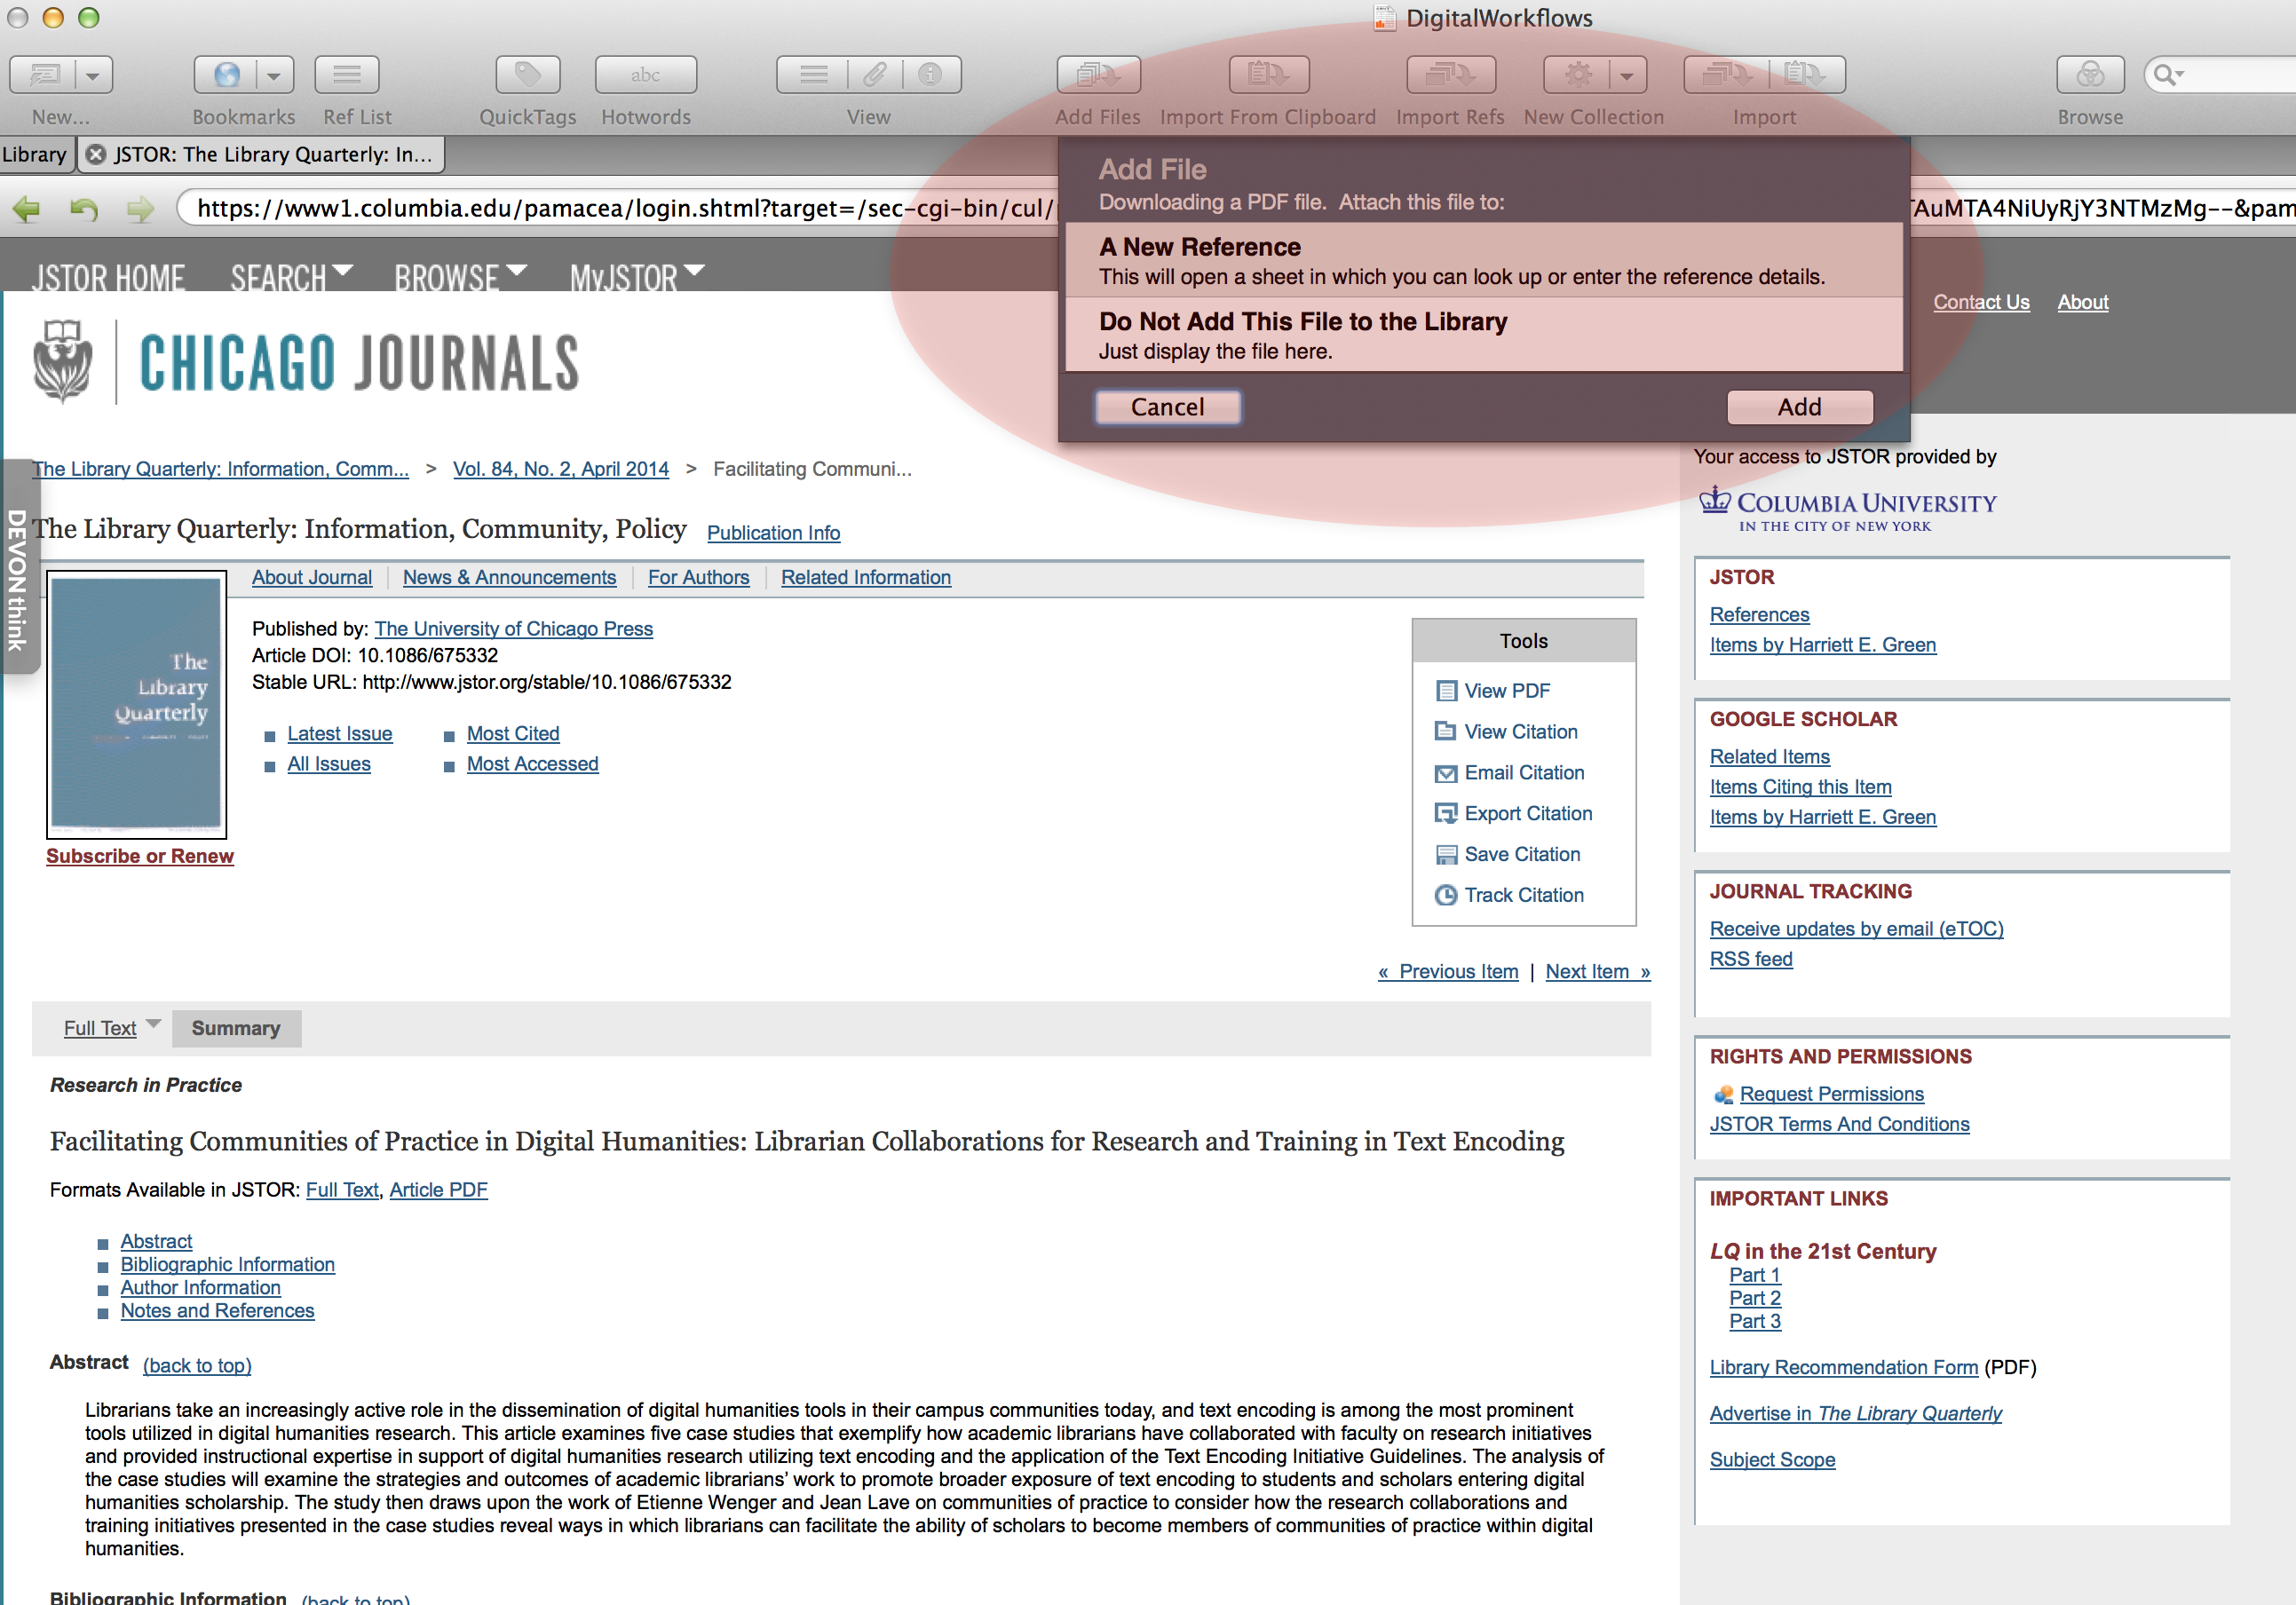
Once you click accept, Sente will automatically download the PDF and the following box will prompt you to either read the file or add the file to the library as a new reference. Sente is pretty good about automatically importing JSTOR references with the DOI.
Once you click “add” the metadata imports flawlessly this time, and you can read your PDF and check your entry.
What if the PDF downloaded in the Sente Browser Target Mode is not OCRed? Help!
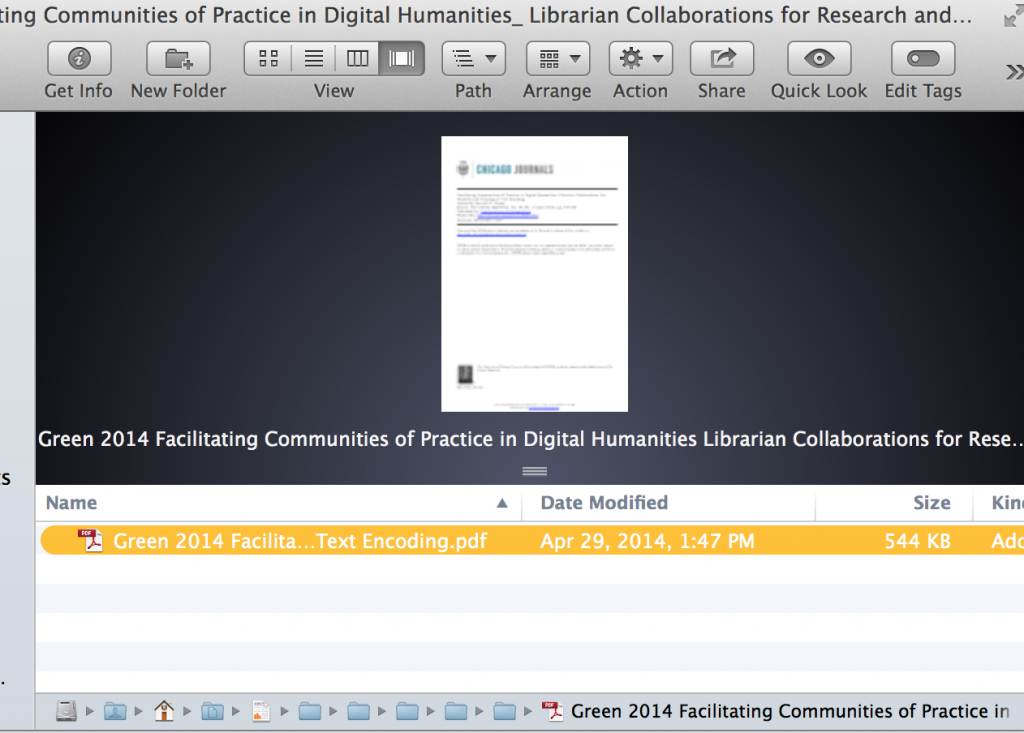
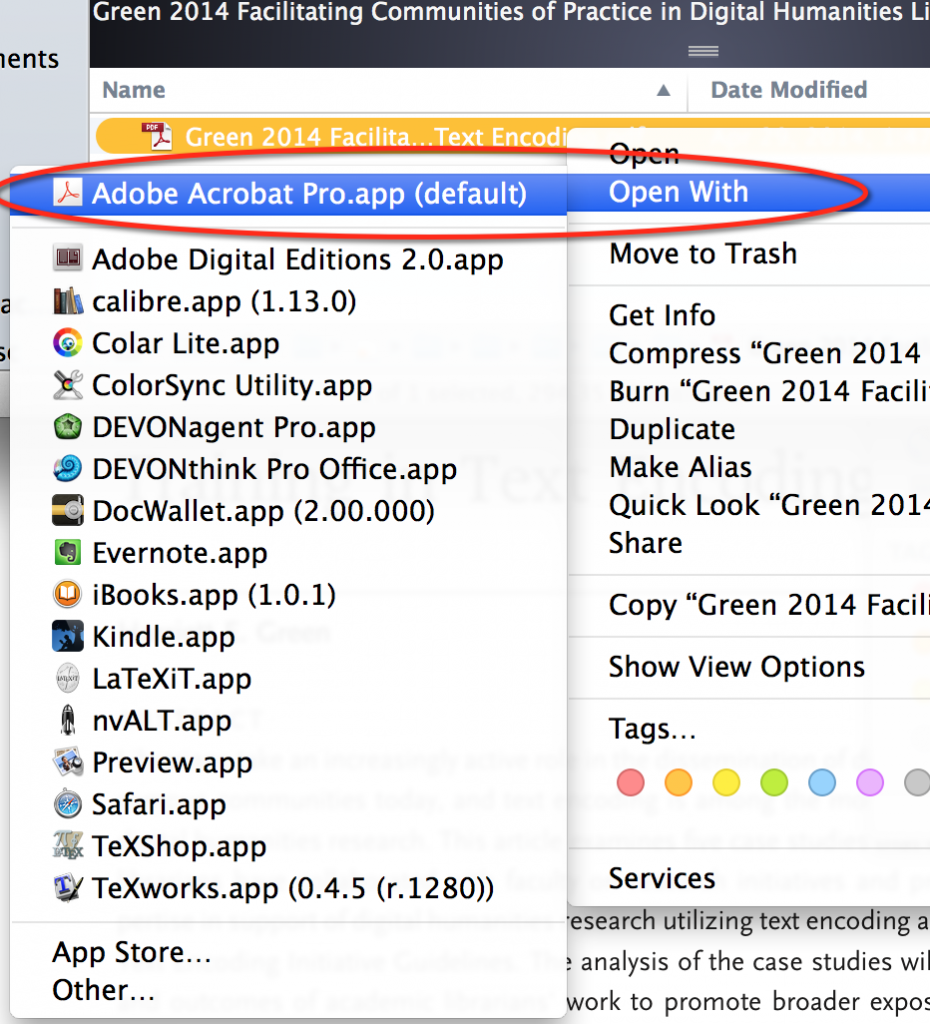
Remember that if your PDF is not OCRed, you will need to find it in the library bundle and use Acrobat or DEVONthink to OCR the file (DEVONthink licenses the Abby Finereader software for its own OCR functionality). To find the file, and open it in an external reader and/or OCR it with Acrobat for example, and OCR it, and save it from its location in the library bundle. If you are unfamiliar with the bundle, go back and read my last post.
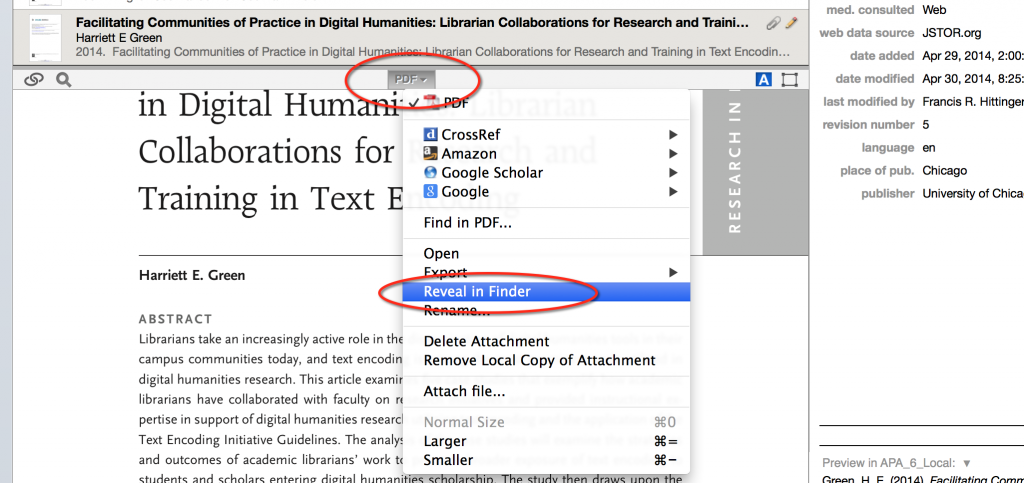
You can click on any reference and delete/modify attachments and find other information about it in the attachment menu–which can be found in the attachment pane, toggled by pressing Command + Option + G.
Click the drop down menu, “PDF.”
Once you click “Reveal in Finder,” you can navigate to the file in the bundle,
then manually open it up in Acrobat:
Initial Organization of Added References (1): Statuses for Process
 There are three other places in the initial reference editing box where you can add your own sort of metadata to references in your library: statuses, star ratings, and tags.
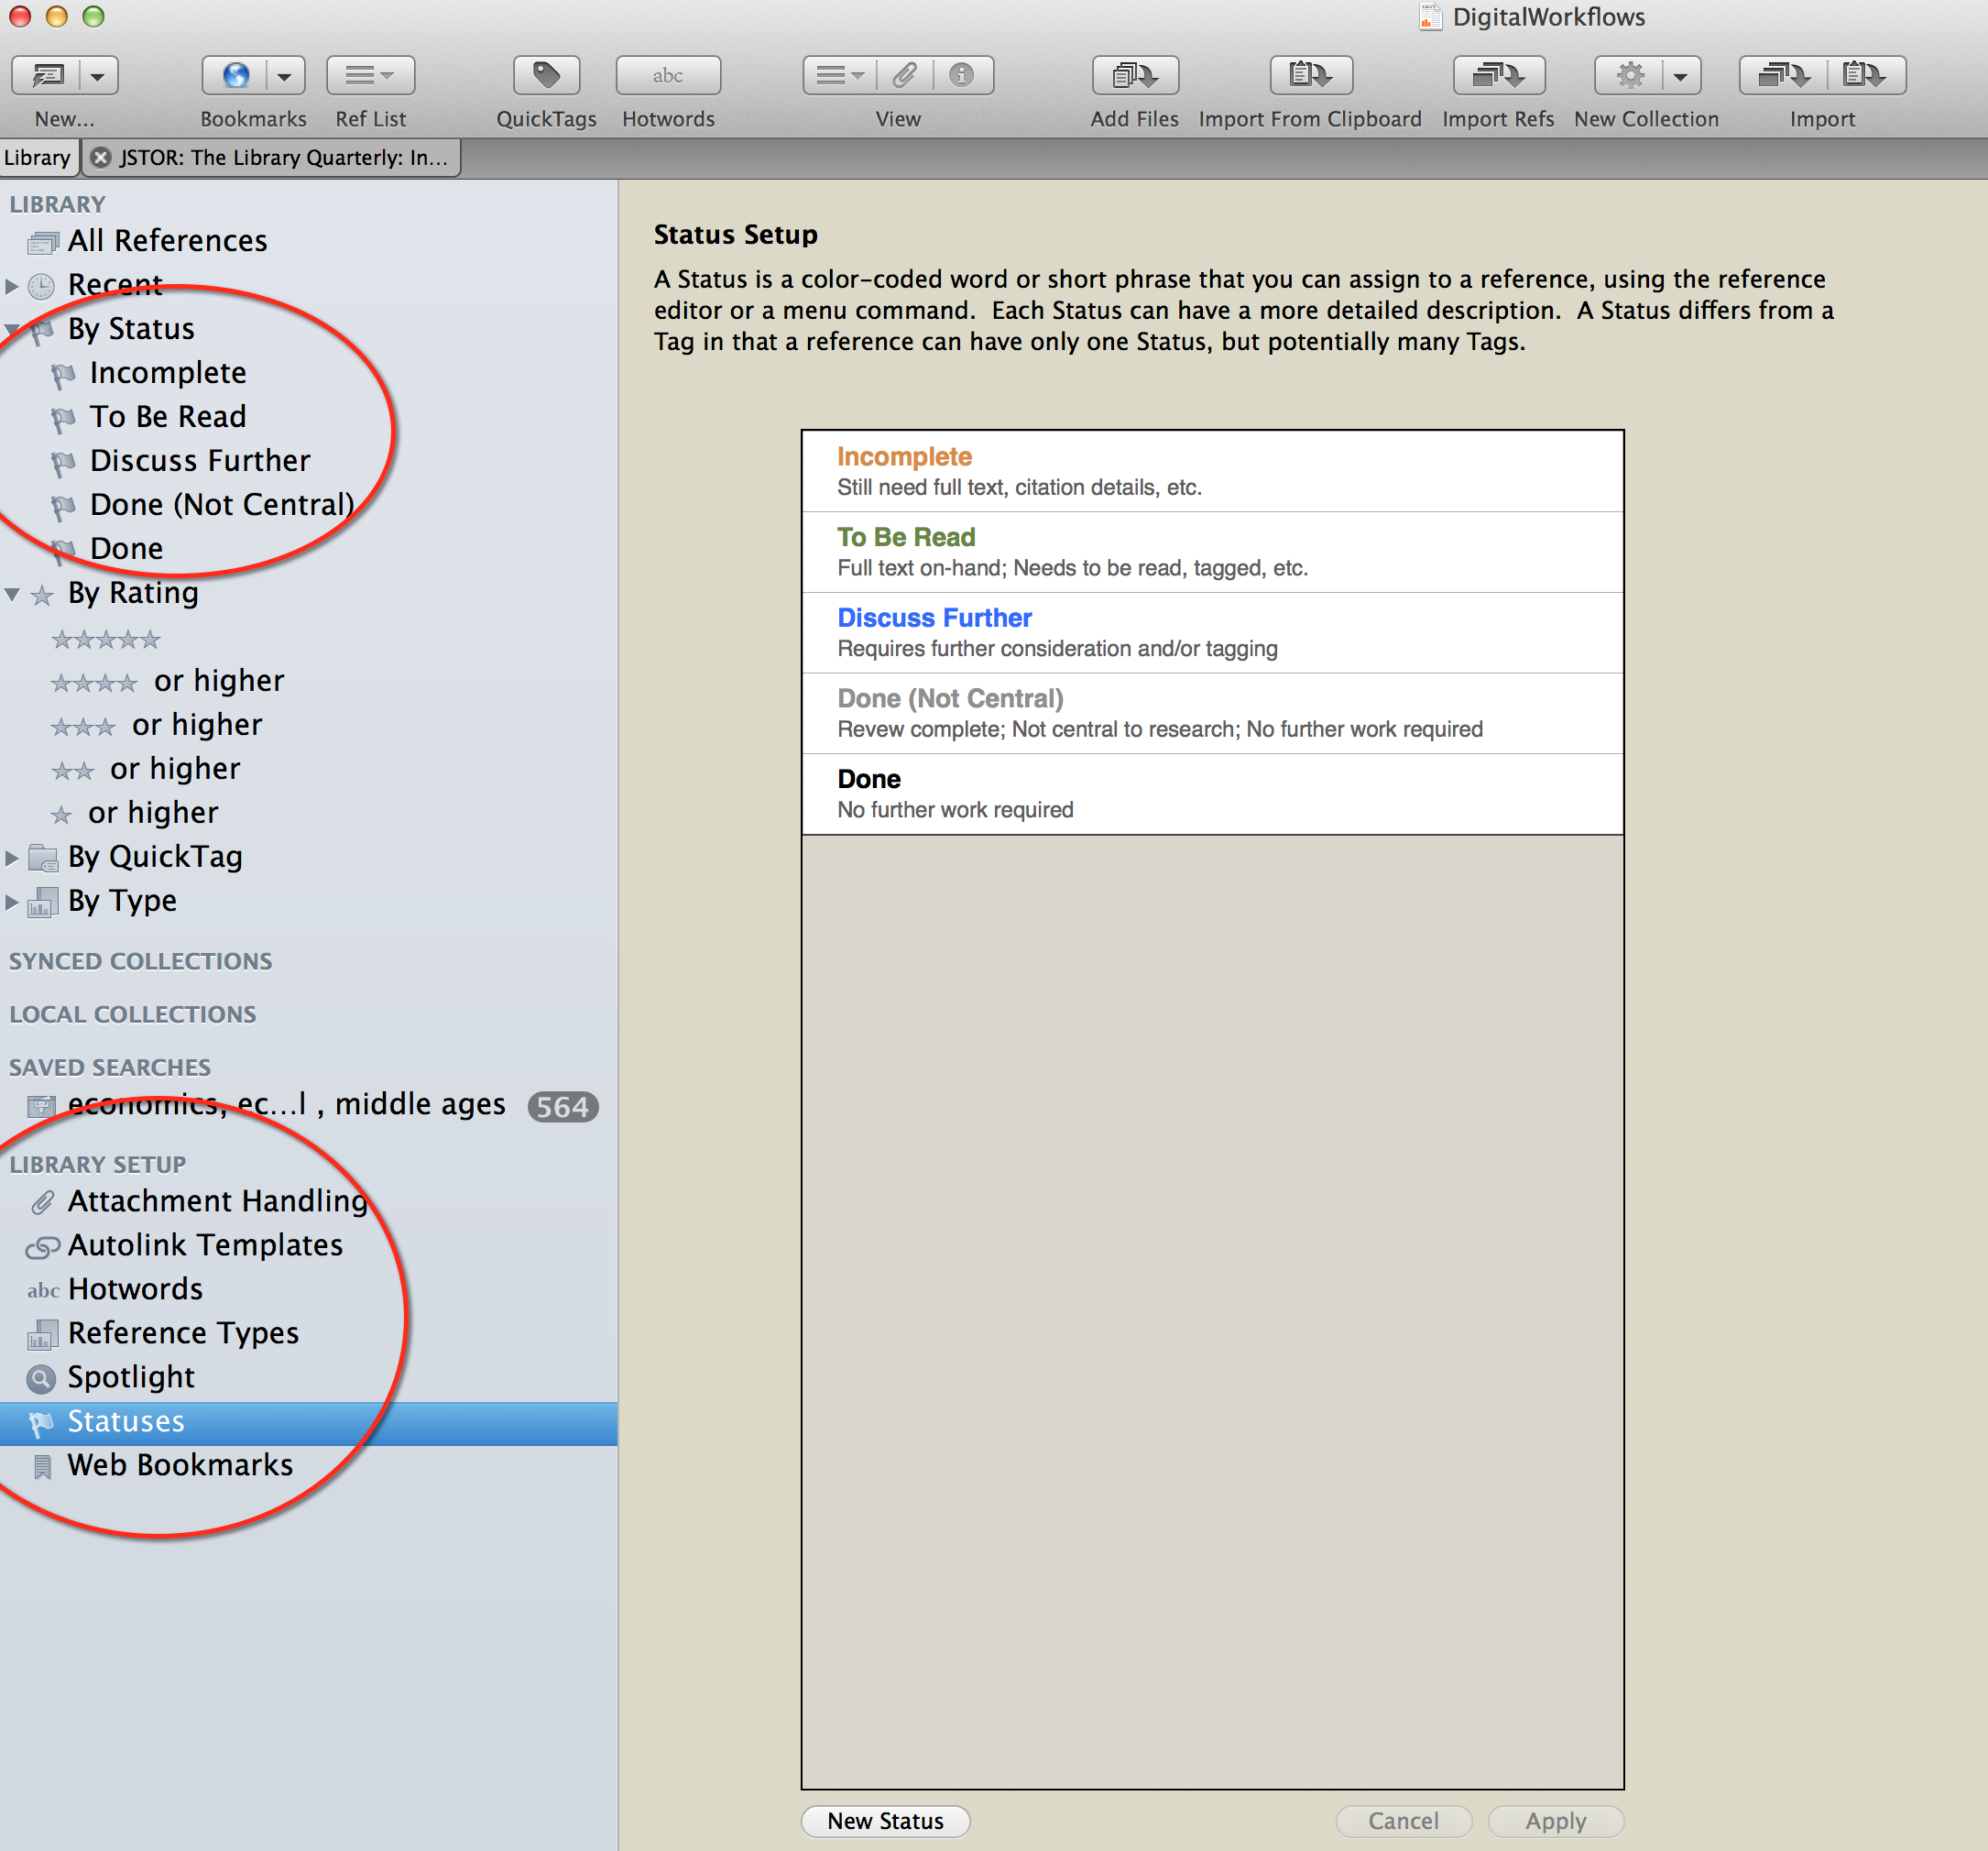
The first one I want to discuss is the status box, which appears in the top left corner of the reference box, as shown here (Remember you can always open the reference editor by pressing Command (⌘) + G). The default statuses are “Incomplete,” “To Be Read,” “Discuss Further,” “Done (Not Central),” and “Done.” As you see below, these statuses appear in on of the tabs of the library in the left column, and in the library setup, the “Statuses” category allows you to modify them.
What I like most about the “Statuses” is that they allow a lot of versatility and customization for the user in terms of labeling things purely for process.
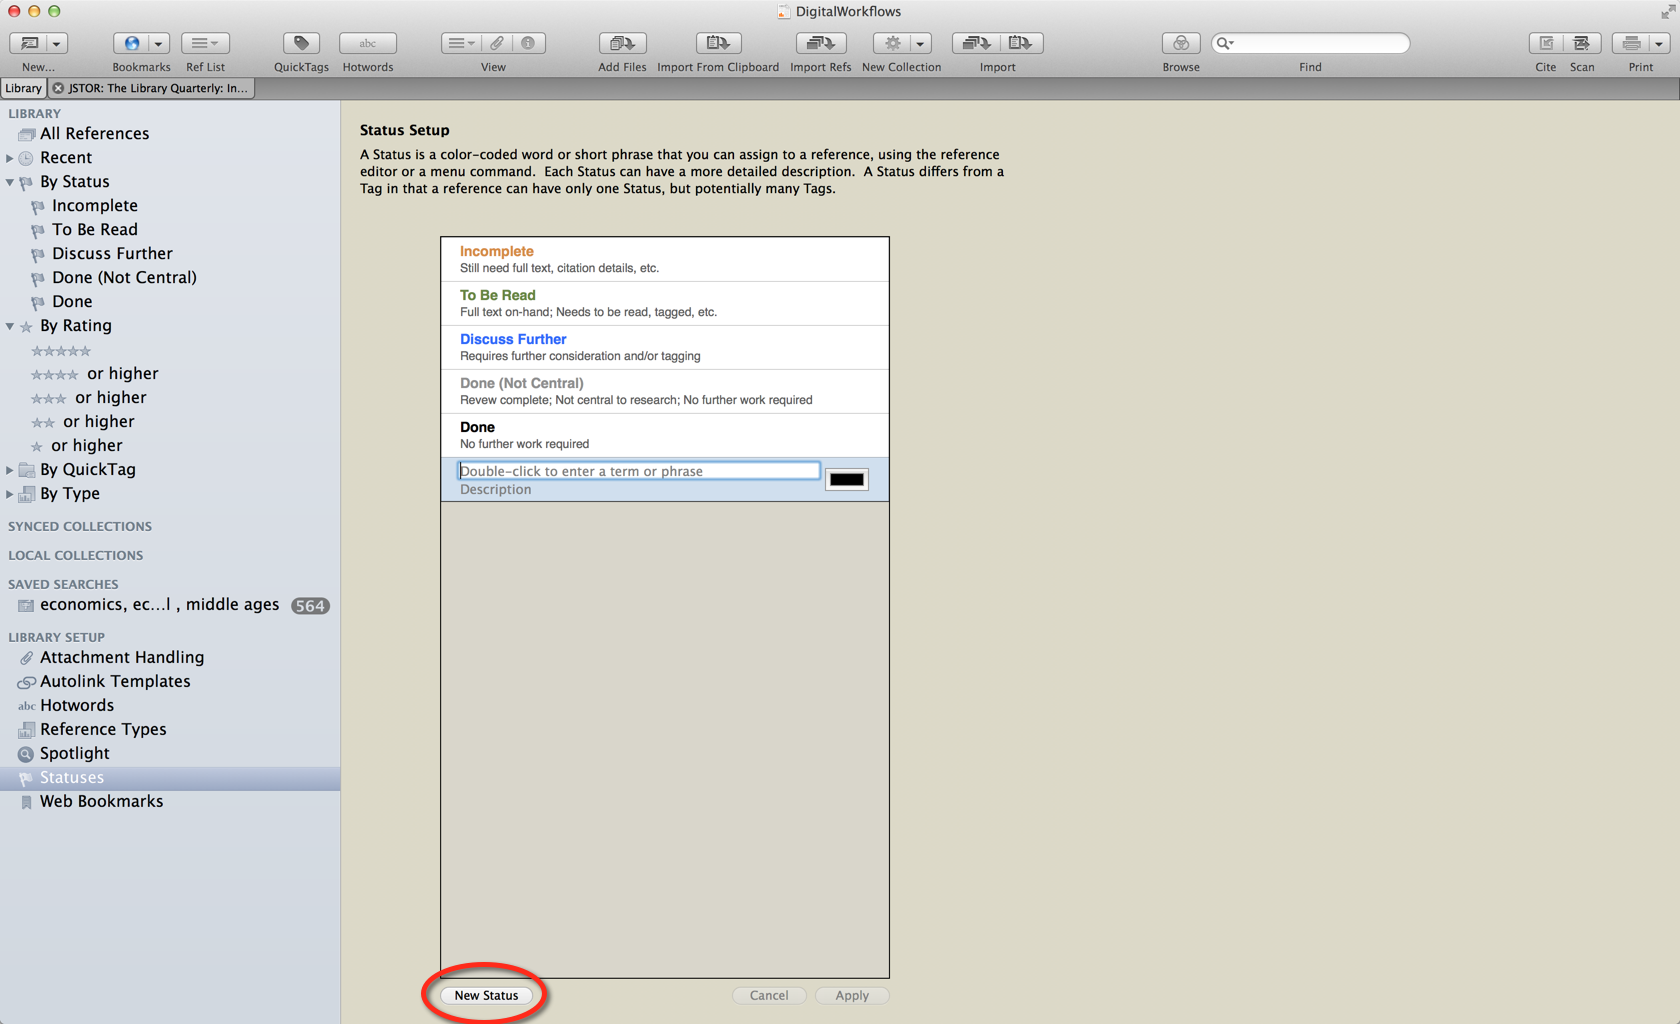
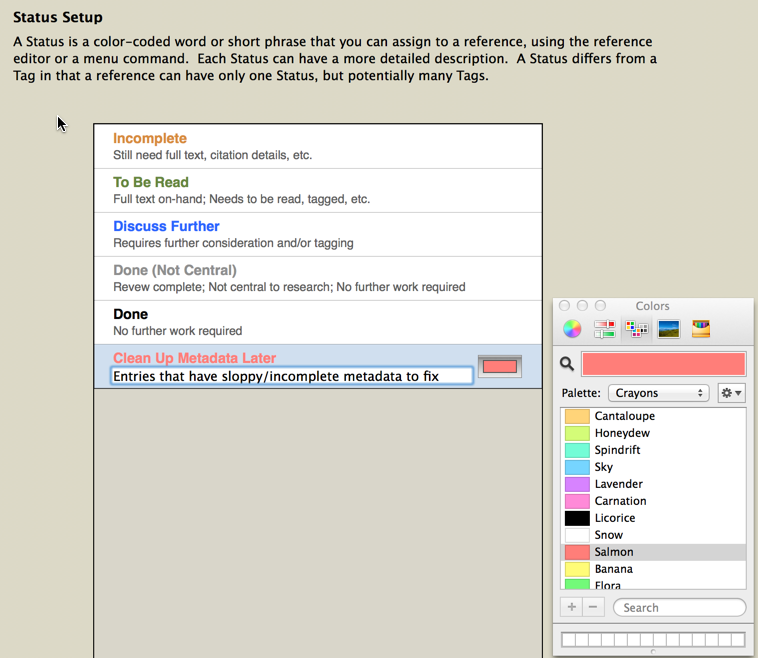
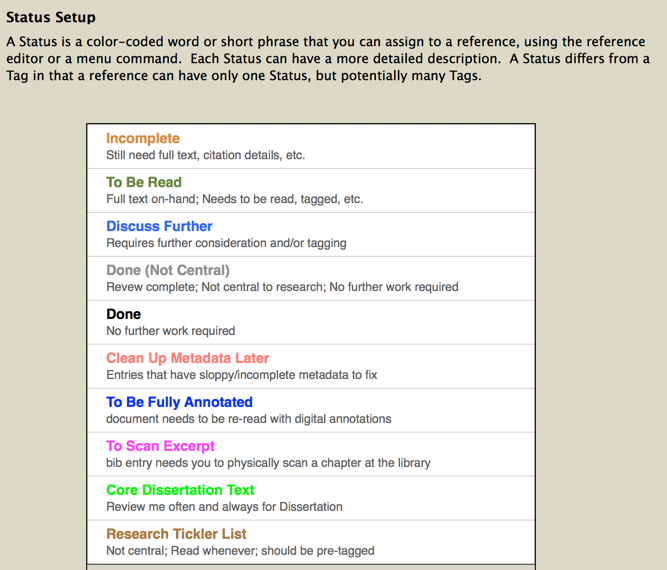
Here are some suggested “New Statuses” I think could be helpful, but I merely demonstrate and leave it up to you. You could also use them to label content, by language or subject, for example, or even level of criticalness to your research, but that sort of thing is more for tags, stars, and quick tags. Statuses are great for labeling stages of process in reading, annotating, thinking, tagging etc.
Here I make a new status: “Clean Up Metadata Later.” I give it a Salmon color, and will use it when I know I need to go back to clean up the metadata for entries I don’t have time to do at the moment.
I also make a category for “Core Dissertation Text,” a “Tickler List” of research materials I’d like to read someday, if ever, and I make a status for potential bibliographical entries without attachments that might require me to physically scan an excerpt for my research later. I could use this label to make sure I don’t forget to make those scans.
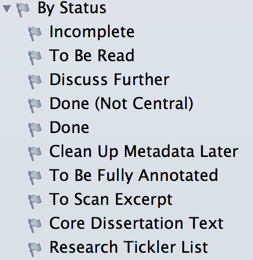
As we see below, this turns up in the status list to the left once I hit apply:
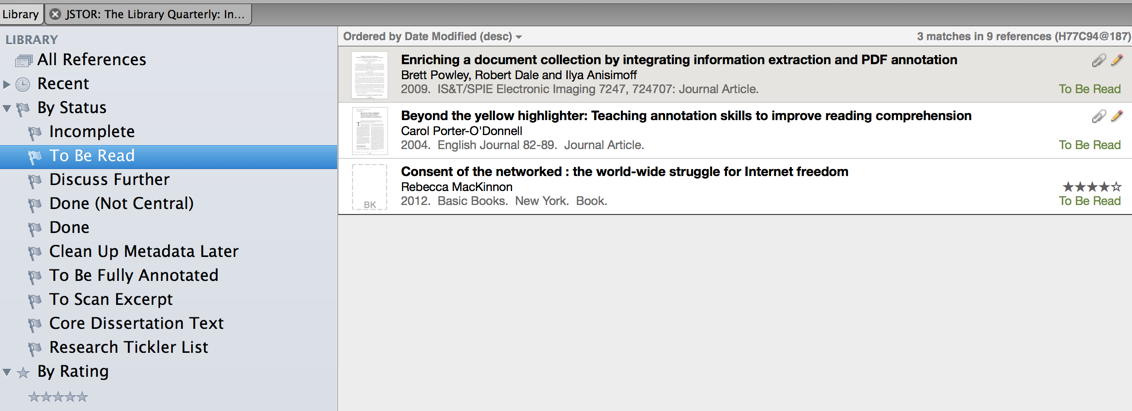
And, as we see again below, when we click the status, Sente will then sort and display all the entries by that status.
Initial Organization of Added References (2): Stars
Note, you can also give various titles and references a star rating. This is self-explanatory and works almost the same as the status function, except all you have to do is click the star rating in the top right corner of the reference editor when you’re ready to give it a rating. It requires no customization. The sorting mechanism is also on the left column of the library window. 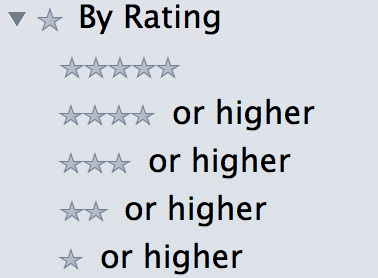 I like to do this only after I’ve read the book enough to have formed my opinion about it. I think it’s a great category of custom metadata because even if something is important scholarship in the field, if I severely dislike the argument or substance, over time and with many ratings, I can sort my whole library by things I like and dislike, and also learn interesting things about my own research and scholastic preferences.
Initial Organization of Added Files (3): Tags and Quicktags
What about all the tagging? This is a big topic that will have to be kept relatively short in relation to how long it could be. This is an image I took of some of my own research books, and I like this image because it captures two ways of thinking about tagging. One way of thinking about tagging is for individual books. When I read and annotate–and we will think about this in the post on Sente for annotation–there is taking quotatings, marking pages, and even writing notes and comments in addition to key words in the margins of texts. I still have a habit of keeping stickies and Post-Its handy when I read print books, and no one will argue that it’s helpful when you need to remember key points of areas of a book you have read. Now, as this picture shows perfectly though, this concept can be applied to libraries of multiple texts, just as it can be applied to individual texts. One kind of annotation–the kind we will discuss in the later post–is centered on citing quotable text, pages, and making custom comments. These comments, as I will show you, can also be “tagged”, Twitter style with #hashtags, and you can build a tag cloud using Sente assistant to keep track of your tags of individual notes you have taken.
Let’s hold off on this for now, because the current topic, Sente’s “Quick Tag” hierarchy, is designed to tag references and draw inferences between possibly thousands of items in your master library collection, over a long period of time. Sente makes this easy by building in functionality for complex tagging ontologies. These tags, within a Quick Tag ontology, will autocomplete when you add tags to the reference editor, but not vice-versa. In other words, if you simply add tags to the tag window when you are adding or editing your reference (below), they will not automatically become part of your “Quick Tag” ontology.
 However, if you build up a “Quick Tag” ontology, those tags will auto-suggest and populate in the tagging window. To understand the basics of “Quick Tags,” which can be toggled by clicking the “Quick Tags” button on the main menu, I borrow the following efficient explanation from the Sente blog, lest I make a good explanation confusing:
1) In Sente 6, keywords are words or phrases attached to references by external data sources (PubMed, Web of Knowledge, JSTOR, etc.). Tags are words or phrases assigned to references by the Sente user.
2) In Sente 6, tags can either be created and assigned “on-the fly” by simply typing new values into the appropriate field in the reference editor, or assigned from the new QuickTag palette.
3) Tags in the QuickTag palette can be organized hierarchically. That is, one can organize QuickTags into categories that nest arbitrarily deep. Note that this is different from many tagging systems that do not permit nesting of tags.
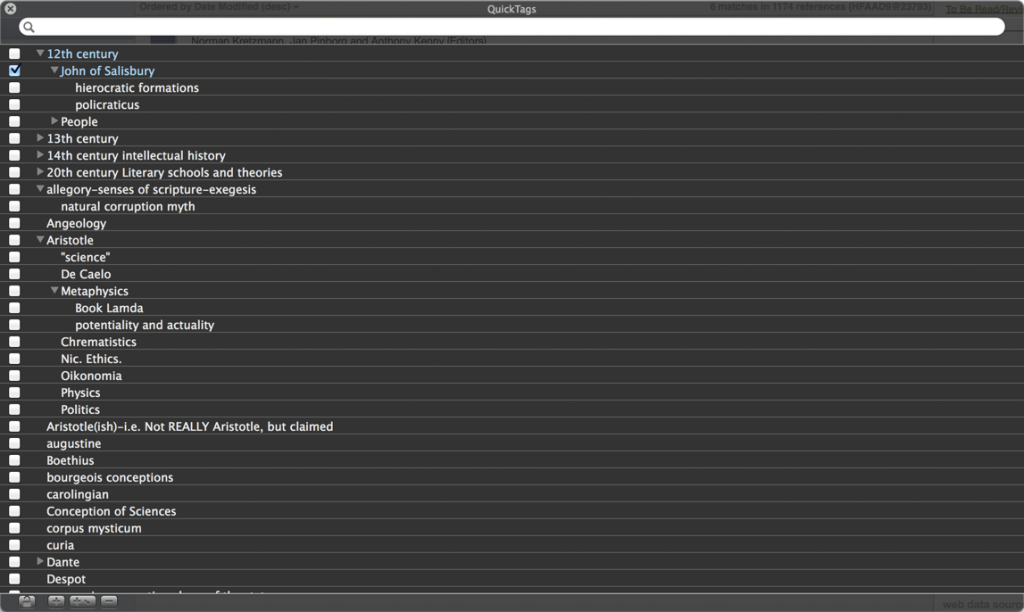
For many people, it will be most efficient to work with tags using the QuickTag palette window. This window displays the entire hierarchy of QuickTags and shows which tags have been assigned to the currently selected reference(s). Toggling tags in this window will assign or remove a tag from the selected reference(s), which makes it easy to assign tags to many references at once.
In Sente 6, tags can be used in Smart Collection definitions and Sente automatically creates a hierarchy of built-in smart collections matching the QuickTag hierarchy, so you can easily see all the references that include any particular tag.
One thing to note about the QuickTag hierarchy is that if a reference is tagged with a tag several levels down in the hierarchy, it behaves as thought it is tagged with all of the parents of that tag. For example, if the QuickTag list included a category called “Bicycles” with sub-categories of “Mountain Bikes” and “Road Bikes”, any reference tagged with “Mountain Bikes” would be included whenever references tagged with “Bicycles” are displayed. And these “implied” tags are evaluated on-the-fly, so if you were to change the hierarchy, the new structure would be used when determining which references should be included.
The practical benefit of applying this tagging hierarchy over the long–term in your main Sente Library is obvious: you will eventually be able to draw connections between many different sources.
The best practice for tagging is to try to develop some basic tags in your QT ontology first, though this takes more work early on, and try to make these autopopulate the tags in the tag window of the reference editor. Here is an example of an ontology I made, which needs to be re-designed, but will give a general impression of what’s possible.
To design or not to design a complex QT Ontology?
This has inspired some spirited discussions amongst Sente users, and the simple answer is that there is no one uniform sort of complex QT ontology, but many possible sorts, and moreover, that different users with different interests, fields, and methodologies, will make use of this in different ways. My main point here is to merely point you in the direction of those discussions which you can browse on the Sente forum: http://sente.tenderapp.com.
Stay tuned for future posts!
