
This is the sixth post in the series Digital Workflows for Academic Research on the Mac for the Columbia Libraries Digital Humanities Center. It is written by guest contributor Dr. Daniel Wessel. Daniel is a scientist at a research institute in Tuebingen, and holds a research doctorate in Psychology from the University of Tuebingen (Eberhard-Karls-Universität Tübingen), Germany. During his dissertation thesis on supporting interest and learning with mobile devices, he became interested in ways to organize creativity in art and science (including writing a thesis). This interest turned into a blog and a freely available eBook, Organizing Creativity (http://organizingcreativity.com).
There is no way around it. At one point, all writers face the task of collecting and organizing all their ideas and evidence to produce a coherent written text. And academic texts usually contain a lot of complex information. Putting this information into a coherent structure can be overwhelming and seem like an insurmountable task.
However, there are different ways to facilitate this task. Scientific writing is a craft — it works by using tools on the materials you have. And the tool I highly recommend for scientific writing is a content outline.
In this text, I’ll describe content outlines, their advantages and possible disadvantages, how to create them, and using an outliner application for working with them (with Circus Ponies Notebook as example application).
Content Outlines
Content outlines are different from simple structural outlines of a text, e.g., the Introduction, Methods, Results and Discussion structure for articles, or Introduction, Main Part, Conclusion structure for essays. They are also different from to do lists (e.g., what you want to read for the text) or mere place-holders (e.g., to what you want to refer at which part of the text, like “something about x here”).
Instead, a content outline contains all the information that is used in the final text in a flexible, self-contained structure. In other words, in a content outline, you write down everything you want to use in the text, but in short information units you can easily move around.
Every information unit in the content outline must fulfill the following two characteristics:
- Independent Units: The information unit must be understood on its own. This requirement essentially means short texts, almost like bullet points on a slide, but still understandable. It allows changes in the order of the information when you create a coherent structure or narrative. You grab it and move it around and can still make sense of it.
- Source Information: Each information unit must be tagged with the source. This requirement is crucial to correctly refer to the source when you write the text. Otherwise you can (and likely will) be found out as plagiarist (give Google a few years more). And whether deliberate or not, that time-bomb will impede or even destroy your career.
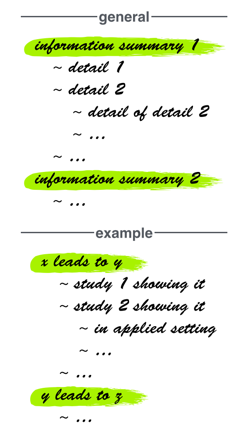 The outline itself is usually not only linear, but also hierarchical, i.e., it contains groupings of information (see sketch on the right). This mirrors the later text, as text are usually linear. But texts also contain groupings or hierarchies of information. For example, you give an overview, then go into the details. Or vice versa, you group small pieces of information into summaries. Grouping information units is crucial: Unless you aggregate information, you risk get lost in the details, of losing sight of the wood in all the trees.
In a content outline, you create this hierarchical structure by indenting information, often multiple times. This indentation gives you a visual structure and allows you to refer back to the concrete information that is the basis of, e.g., a summary. Nothing gets lost, but everything is easy to find. And it can be easily changed later on. Prior to writing you can decide in which depth (“indent level”) you want to use the information for your text.
With a content outline, you focus on getting the information down first (the bones of the text). Writing can support thinking and you should think when you externalize and collect the information in a content outline. This allows you to see which information you have available, and to group and sort it into a coherent structure. But you don’t write actual paragraphs (the “flesh” of the text). Because when you write paragraphs, the sentences stick to each other (“thus …”, “therefore …”, or merely by their implicit order). Yes, you want the text to flow from sentence to sentence, but only when you are sure that this is the order in which you want to provide the information — i.e., in the final text.
While the rough position of the material is usually determined by the structure (e.g., your analyses go into the results section, your interpretation into the discussion section), you need the flexibility to reorder information within these sections. After all, you are not putting down facts one after the other like a robot. You argue in your writing, you are writing to make a point, to show a finding, and show why it matters or should matter to the reader. As objective and as truthful as possible. But you argue, and finding that structure to organize your information into a convincing narrative is hard. Trying to create or improve this narrative when you have already written a lot of text is tedious and wastes a lot of time and effort. You have to unravel your text again and again, like Sisyphus stuck in editing hell.
Note that the information you collect in a content outline can be anything that is relevant for your text, e.g., structure information of the text (e.g., “Introduction”, “Methods”, …), summaries of studies you have read, models of theories, notes on how you conducted your studies, result tables, diagrams from analyses, notes about your interpretations of results, conclusions, etc. Nearly everything has its place somewhere in the content outline. Whether it goes into the final text is another question which you can decide later. But externalize it — and keep it flexible.
Advantages of Content Outlines
In my experience, a content outline is the best mixture of a) having information to create a structure and think about what you want to say, and b) keeping the flexibility to actually implement the structure you come up with.
Treating your material as information units that are understandable on their own, refer back to the source information, and can be freely reordered and grouped, essentially turns writing your text into building with Lego(TM) bricks. You can build your thesis or article with these bricks, allowing you to easily deal with the information you have and change the order until you get to a narrative that works. You can also “weigh” each stone for its quality and group them into “prefabricated” parts.
Additionally, these are some of the advantages of externalizing all the information you need for the text in a content outline:
- You can discover contradictions and gaps: Using content outlines allows you to see contradictions and discover gaps in your arguments. Humans have a high capability for holding contradictory thoughts. If you never thought about the two distant aspects of your text together, you might miss a contradiction. Externalizing your thoughts early prevents you from stumbling upon them when you have already written a lot of — suddenly questionable — text.
- You are less likely to forget anything: There are a lot of things you have to consider for a good scientific text. You cannot hold everything in your mind — and if you did, there wouldn’t be much capacity for anything else.
- You have a guide for writing: During the actual writing process, it provides you with the necessary information to write a good first draft “in one go”. You do not need to look up information or do additional analyses, which interrupts the writing flow.
- You can focus on other things: You do not have to keep all the information or the sequence of the text in mind (virtually impossible), thus it reduces the mental effort to remember information. You can use the available resources to focus on the quality aspects of scientific writing (e.g., precision and clarity).
Once you have ordered the information in the right sequence, writing can become a breeze: The logical structure is clear to see and guides the writing process. For example, when my content outline (27k+ cells/1338 outline pages/320k words) of my dissertation was finished, I was able to write the thesis document (250 pages, 71k words) in a month.
Challenges of Content Outlines
No tool is perfect, not for every task and not for every person. There are (at least) three important caveats to consider when using content outlines:
- There is no guarantee that the content outline “works” until you have written the text. While you can gauge the text by “reading” the content outline — you essentially have talking points — there still is a gap between the content outline and the final text. Still, with some experience, you can learn “read” the content outline fairly well to get an idea whether it works or not.
- A content outlines puts a lot of work in finding the right structure before starting to write actual text. Keeping the structure flexible yet having all information available avoids editing hell … but it takes a long time until you have text to show for. It’s risky if it fails. While fewer revisions might be needed, do not underestimate the final writing task (being able to type with 10 fingers is really helpful here). Also, given that much of the writing happens “in one go”, be sure you know the requirements of the text that is expected from you. A good recommendation is to write a two page writing sample based on the content outline first and give it to your supervisor for a feedback. Identify the kind of mistakes you make and keep a reminder in sight while writing the final text.
- Given that you write the actual text relatively late, so there is little to share with an adviser. Whereas it contains all the information in the right sequence, a content outline is very hard for others to understand. A bit like giving someone index cards with talking points and asking them to do a presentation. It would not go well. Thus, you cannot simply give the content outline to your adviser to discuss your work. However, you can either type a short summary (the hierarchical structure of the content outlines makes this easy), or verbally discuss the structure. After all, the content outline does give you the necessary talking points. The content outline is also a good basis to create presentations for colloquiums, conference submissions, etc. After all, the information is available small information units to pick and chose from.
Creating a Content Outline
If you want to use a content outline for your text, try the following steps (and have a look at the tool suggestion in the next section):
- Create a structure outline first. Most texts have clear structural requirements (e.g., Introduction, Method, …). Start with this structural information, as it is the highest-level structure for the content outline. Make it stand out via highlighting, bold, etc.
- Collect all your information in the content outline. When writing, take care to:
- Use short notes, not full sentences for the cell content: Avoid using “connections” like “therefore”, “thus”, “this means”, etc. They connect sentences and “glue” them together and you cannot resort them easily.
- Use square brackets […] to add context information when needed: For example, what does “this” stand for, or “these points”? Even more important: Always make sure you keep your notes in line with the direction the author argued for! Imagine you write down points “for position x” an author has mentioned. But the author overall argues strongly “against x”. In these cases it’s important that you don’t cite the author later as arguing “for x”, even if this person conceded that there are arguments it. Authors take a very dim view on being misrepresented — for good reasons. It’s essentially quote-mining.
- Always use tags or square brackets to denote the source information: Yes, you might never write in this characteristic style now, but the text you have to write likely has the same style requirements. And once you have written text of your own in that style, it will be very hard to differentiate between text you found and text you have written. In time you might even naturally write in that characteristic style (welcome to the community). This is particularly relevant for a PhD theses which takes years to write. Trust me on this, after a few years, you will have no idea where that information did come from. And plagiarism, intentionally or accidental, damages or ends careers.
- Within an information unit, clearly differentiate between your own notes and cited text: Related to the previous point, use quotation marks if you mix cited text with your own notes. Alternatively, if you cite a lot and suddenly write your own notes, use something like “myNote:” or square brackets […] for your own notes.
- Be careful if the cited text refers to another text: Authors frequently refer to other sources. If they use a verbatim quote, use something like “INQUOTE:” to make clear that it is not the authors who say this, but the people they cite. If they summarize other texts, preserve the information that this is a summary by the authors of another work. Never ever simply take their citation or summary as if you had read the cited text. If you would do this, you blindly trust the authors that their citation of the other text is correct. Even worse, when authors cite other authors, they carefully select what they cite or how they summarize a paper. You have to, as you cannot cite everything and condensing naturally reduces the amount of information. But this selection or summary might bias or misrepresent the work. So in adopting a citation other authors make, you not only take their verbatim quote or summary, you also adopt their point of view. And unless you know the original text, you have no way of knowing whether you actually agree with their take on the cited work. For a striking example in everyday life, look at a controversial topic in the news and compare it to the original sources.
- Don’t depend on, but use, inspiration: If you get inspired and come up with good sentences or ways to explain complex issues in simple ways, by all means, write them down as well. Keeping something to write handy and write them down helps, as ideas frequently come at inopportune moments. It does not matter on which medium you capture, it all ends up in the content outline anyway. While the information units are bones, sometimes a paragraph or too can be helpful as well or treated as one unit. It’s stupid to depend on inspiration, but even more so not to use it when it presents itself. And you can always split sentences into smaller information units (and frequently, you should).
- Create a hierarchical structure by aggregating information when needed: If possible, group information and write informative summaries above the grouped information. Don’t just name the content, summarize it in your own words. For example, instead of writing that the indented information deals with “arguments for x”, write a short summary of the arguments or reduce them to one or two words each. It will be a simplification, but putting the content in your own words will help you understand it. Later you can look at the summarized information to focus on the big picture or look at the indented information to dive into the details.
- Continue to collect the information until you have created the whole content outline. It might seem like a good idea to go in sections, e.g., first create a content outline for the introduction, then write the “final” text for the introduction, then create the content outline for the methods, etc. However, until you know what you want and can say, it makes little sense to write an introduction (or any other part of the text). Get the bones of the whole text before you start adding flesh — otherwise you might be creating a monster.
- Check the content. In particular:
- Go through the whole content outline to ensure you have everything you need for the final text: Compare, e.g., the introduction with the conclusion to ensure that you have everything for an overarching frame. Check whether you have all the necessary analyses. All the figures, etc. pp. Look for gaps and contradictions.
- Look at the aggregated information to make sure you know which story to tell: Yes, scientific writing must be objective and truthful, but it must also be understandable to the reader. And this requires some kind of narrative, ensuring the reader understands its importance and its findings. Create this narrative and write down a short preliminary abstract of your work. A couple of sentences, no more than half a page what your work is about. Focus on the story you tell, the information you provide. Make sure the reader understands the point of your work.
- Re-“read” the content outline, one section after the other and make sure the information is in the right sequence: Treat it like telling someone the text. Not what it is about, but the actual content. If necessary, make notes what is important and what you need to remember while writing. Use another color for these notes. The point here is to ensure the clarity necessary to express your point when you start writing. To use an analogy, like “the more you sweat in training, the less you bleed in combat”, the more (easy) changes you make in the content outline, the less (excruciating) changes you have to make in the full text.
- Put the content outline next to your writing software and write down the text. The beauty of the content outline is that all information is visible and in the right order. In writing, the following things might be useful:
- Re-read before you write: Before you write a section, check whether you still think the sequence makes sense. It will also remind you of the direction the writing will go.
- Keep the depth in mind: While the content outline gives you guidance, you can make decisions on the fly, esp. regarding the depth you want to go into. Do you want to go further and further in the indentations (details, in depth) or stick to the surface? How much detail do you(r readers) need? As you can have summaries of summaries and so on, this gives you quite a bit of flexibility during writing. Best decide in advance how deep the text will be in different sections.
- Keep attached to the lifeline (mostly): The content outline also serves as lifeline not to stray from your original narrative. If you have new ideas while writing, you might want to stop and think whether it makes sense to include them in your writing. The content outline shows you how the structure unfolds at the moment. Decide whether it makes sense to change it. Unless it’s a really important issue, I would normally recommend to capture the idea somewhere else and use it for another text. It might also fit into the “further studies” section of the work.
- Mark (but don’t delete) which information units you have already used: Immediately after using it, mark the information as used. For example, by using checkboxes, striking the text through, etc. Just don’t delete it. In some cases, you realize that the text is going nowhere and want to start anew with this section. Then it’s helpful to still have the outline available. It’s also helpful to have a look at the x-ray version of the text, even if you have already added flesh, e.g., for a presentation or supervisor summary.
Using Outliner Applications
Theoretically, you could create a content outline on paper. Practically, when it comes to content outlines, digital tools shine. Digital tools give you the ability to quickly deal with a lot of information in a highly flexible manner. While you can use any program from a simple text editor to Word to MindMap Apps or the like, I would strongly suggest taking a look at an outliner.
Outliners use “cells” to contain information. But unlike the cells in Excel or other spreadsheet programs, you can easily move the cells to re-arrange them. Even more practical, you create a hierarchical order by indenting cells below other cells. The indented cell becomes a child cell of the parent cell it is indented under. You can then collapse all child cells under the parent cell, leaving only the parent cell visible. This makes it easy to move the parent cell around (and with it, all not-visible child cells) until you want to expand the parent cell again to view its child cells.
To give an example, have a look at the following video (animated gif, also as Video on YouTube):
This function is extremely useful for dealing with lots of hierarchical information — which is the basis for every article or thesis. You can collapse information as needed to see only the big picture, compare, e.g., information in the introduction with the conclusion to ensure a consistent frame, put lots of statistical detail information in child cells and summaries in the parent cells to help you make sense of the data, and much more.
There are a lot of different outliner programs. Personally I use Circus Ponies Notebook, which — unfortunately — is only available for the Mac (and iPad). But the Wikipedia entry has a list of outliners, including ones for Windows and Linux. In selecting an outliner, make sure you can export the data and that it is stable even when containing a lot of information.
For an example of a good outliner, let’s look at Circus Ponies Notebook and why it works well for creating content outlines.
Outliner Example: Circus Ponies Notebook
Circus Ponies Notebook is an app for Mac OS X and the iPad (see figure below). I strongly recommend using the Mac version and not the iPad version. The Mac version is snappy and a joy to use. The iPad version is nice when you want to have your outline available, but a bit sluggish for actual work.
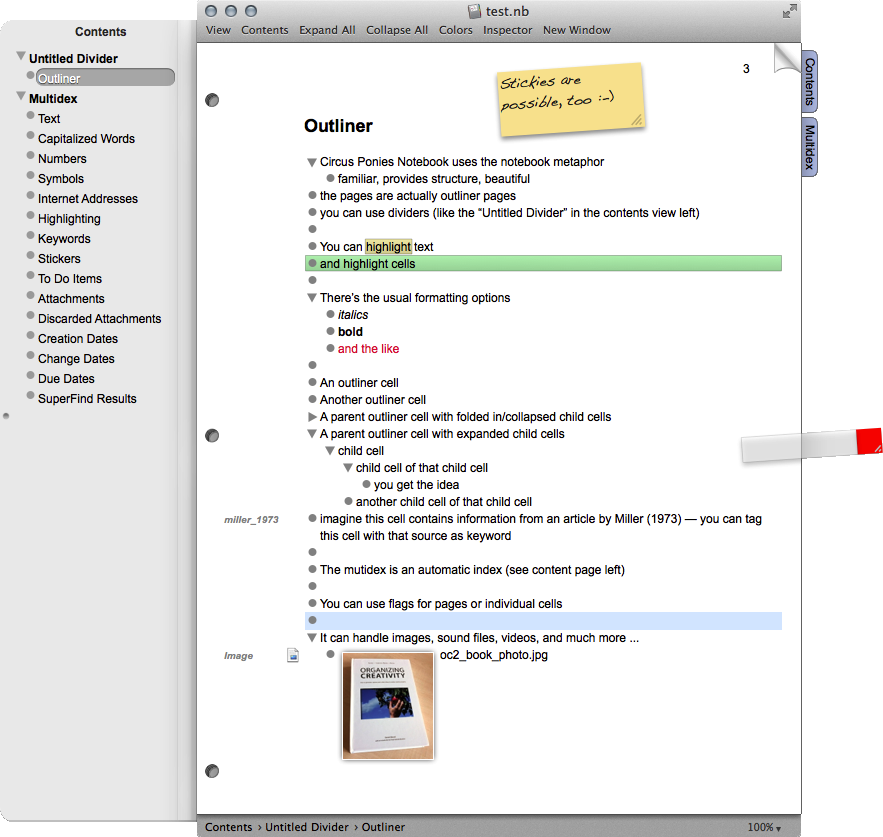 As the name suggests, Circus Ponies Notebook (CPN) uses a notebook metaphor. The concept of a notebook is intuitively familiar and provides multiple ways to structure information. You can use different notebooks for different topics, and use dividers and different pages within a notebook. On each page you can write your information in outlines.
For an article, using a single page to collect and sort all the information is probably best. For a thesis, at least in the beginning it can be helpful to use multiple pages (one for each major section, and perhaps other pages to plan studies and analyses).
To facilitate work, CPN provides a lot of useful functionality.
- Cells: Cells, the Lego(TM) bricks of your writing, can be assigned with priorities, stickies, keywords (= tags), and much more. They can easily be rearranged by clicking on the gray circle on the left of the cell (triangle if it’s a parent cell containing child cells) and dragging and dropping them.
- Cell content: Cells can handle almost any data. You can directly write text in a cell — and you will likely do this a lot. Using text allows you to easily search for it. But you can also add files like Word or Pages documents, Excel files, PowerPoint presentations, videos, sound files, images, scripts, data files, etc. pp. If CPN recognizes the file, it shows, e.g. the image itself or the first page of a PDF file. If CPN does not recognize the file, it still imports it and shows you an icon of the file. Double click it and it opens in the respective application. I would not use CPN as document storage, but inserting the necessary images, statistical analyses, etc. and being able to easily move them around? Highly useful.
- Different copy and paste options: You can paste text with and without formatting. You can also paste text as outline. Any paragraph break will start a new outliner cell. Note that if you copy and paste cells, depending on the copy and paste method you chose, keywords you have assigned to a cell will either be preserved or lost! Check the “Edit”, “Copy” and “Paste” options.
- Navigation: There’s a content tab on the left, a Forward/Back Button similar to a browser in the toolbar, tabs can be assigned to dividers or pages, stickies (the red one in the picture) can used as bookmarks for pages or specific cells, and much more.
- Multidex: CPN automatically creates an index of all used words, capitalized words, Numbers, Symbols, Internet Addresses, Highlighting, Keywords (= tags assigned to cells), stickers, attachments (= files, incl. images, added to the notebook), and more. Highly useful if you search for something.
- Export as rtfd, Word, etc.: Given that CPN is not that widely used, you might need to get your outline in a different format if you want to share it. You can export the outline as webpage, rtfd, doc, and much more. Look at the export options, esp. the “Expand all Items before exporting” option. CPN can export what is current visible in your outline (e.g., collapsed cells will not be exported/printed), or expand all before exporting. Both have their uses, be sure you get what you want.
Looking at these features in context of content outlines, you can see why this program is so incredibly useful:
- Cell hierarchy to deal with the content information: As written above, you can indent cells to order the information hierarchically and expand/collapse as needed.
- Pasting Text as Outline to quickly import and reorder information: If you want to restructure a document, simply copy and paste it as outline. If you want to remove the formatting, copy and paste with match style first, then cut everything and paste it again as outline (on the page, not in a cell). Given that paragraph starts a new cell, you have the text neatly separated in cells by paragraph. This separation allows you to reorder the paragraphs quickly, create parent cells with summaries of the paragraph’s content, etc. You can split a cell into two by pressing ctr + RETURN. The cell is split at the cursor position. Very useful to split imported text into smaller units.
- Keywords for source information: As you can assign keywords to cells, it’s very useful to use keywords for the source information. For example, if you use authorname_year (or authorname_authorname_year, etc.) to name and refer to your literature, you can use this as a tag. Want to know where the information in the cell is from? Display the keywords (cmd + k) and the information is there. Note that:
- Length of source names: Using a short reference like authorname_year does not waste much screen space (you can manually change the width of the keyword margin). Use a, b, c, etc. for multiple works by the same author(s) in the same year.
- Assigning Keywords/Tags: To assign keywords, write the author information, highlight it, and right-click on the highlighted text and chose “Assign as Keyword”. You can then click on any cell (gray circle/triangle) in the notebook to highlight the whole cell and right-click on the cell to select “Keywords”, “Add” and select the keyword. Even better, you can select multiple cells to assign the selected keyword to all these cells. If you enter a lot of information from the same source, it can help to create a new page, enter the information there, then select all cells and assign the keyword in one go.
- Keywords for own notes: If you want to use keywords for your own notes as well (to ensure that you remember that these are your thoughts), consider using something like “0 your_name”. The keywords are sorted alphabetically and given that you probably assign this keyword a lot, it saves lots of scrolling. Personally, I do not tag my own thoughts — any cell without keyword (or source information in the text itself) is hopefully(?!) by me.
- Keywords can vanish when using copy & paste: However, be careful when you copy and paste cells. Depending on the copy & paste option (CPN has several), keywords are either preserved or get removed. Check after pasting that the keyword is still there.
- Keywords and Multidex: If you want to know where you have used which source, have a look at the Multidex. The keywords have a page there. Essentially an outliner page that lets you display this information as child cells of the used keywords.
- Text formatting (when needed): You can easily change the font (notebook wide default with the Inspector, in the cell with cmd + t). However, best use one font only. Formatting should signal which information is important, not look “nice“. Bold, italics and text colors (via cmd + shift + c) can be helpful. Personally, I use orange as color for general reminders which information must be in which section and what must be clear to the reader after reading the section. I use red for personal notes to make it stand out within a lot of cited text.
- Highlighted cells (to indicate their indent level): Given that you can indent the cells quickly and easily, it’s sometimes difficult to see which cells belong to which parent cells, or to see the indent level on which the cell is. Personally, I use cell highlighting for the highest levels. For example, in an article, cells with the structure information (Introduction, Methods, Results, Discussion) would be highlighted green (next indent levels would be blue, yellow, orange, red, purple — it’s the way I sorted my crayons as a child and the sequence makes sense to me). Using cell highlighting can provide useful visual information about the structure.
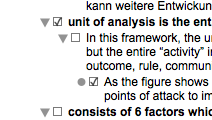 Checkboxes during writing: You can easily assign checkboxes to the cells (select all, right-click on the cell, “Add a Status Checkbox”). These checkboxes are invaluable when writing. Mark which information you have used immediately after you have used it. If you are interrupted or stop for a while, you can quickly pick up where you left. Note that there is a setting in the CPN Preferences (cmd + ,) under the “Action Items” tab: “Change an item’s status to “completed” when all of its children are completed” I recommend deactivating this option. It allows you to tick off the checkboxes independent of the hierarchical structure the cells are in (see figure on the right). Otherwise, checking a parent cell will check all child cells, and when you checking the last child cell, the parent cell will be ticked off as well.
Caveats when using Circus Ponies Notebook
If you use CPN, there are (at least) two caveats you should know about.
- Keep old versions of backups: Doing Backups — early, often, saved on another medium, and stored in a safe location — is good advice in any case. With CPN, make sure to keep the old backups. CPN only loads the page you want to display, so if there ever is an error in saving the file, you might not immediately notice it, but only when you open that page. In case you cannot open a page anymore, you can then go back to prior versions (don’t use Mac’s Time Machine for it, if the disk is full, old backups will be overwritten).
- Careful with the search and replace function: The search and replace function (cmd + f) does not show you the settings unless you click on the magnifying glass. As search and replace uses or does not use case, and can relate to the page or the whole notebook, have a look at the search settings before you search and replace. Otherwise, you might affect more (or less) than you want. BTW, be especially careful when you import text and want to replace hyphenation by using search and replace. If the text contains numbers with negative values, the search and replace might replace the minus sign too. And in contrast to words with missing hyphenation this is much harder to spot while the consequences are much, much worse.
Final Recommendation
This was a short introduction to content outlines. Two final words of advice.
First, tools do not work for everyone and tools are not a silver bullet. I (and others) find content outlines very useful, but they will not work for everyone and for every task. Also, CPN, no matter how powerful it is as an outliner, will not work for everyone. Try out whether it works for you, there’s a free 30 day trial version available. If it does not work for you, look for a different solution. And keep in mind that even the best tools cannot replace effort and persistence, they can only help you to to augment it.
Second, if it works for you, consider using content outlines as long-term storage for your notes, not only for writing one particular text. Just imagine notebooks dealing with different subtopics, each containing pages with outlines of notes about the domain you work in. And all the cells include the source information as part of the outline cells — which are preserved when you copy these cells into an outline for another paper. You essentially have a box of sorted Lego(TM) bricks to work with. With the hierarchical structure of these outlines containing groupings of information units, you even have prefabricated parts which you can copy and paste into a new outline for a new text. In contrast to copying from a finished text, you only copy the bones, allowing you to add new flesh to it and thus avoiding verbatim self-plagiarism. Creating these Topic Notebooks can be extremely useful for long term work with a topic.
In this text, I did not go into the details of how a text must be structured, as this depends on the particular discipline. It should work for any discipline which requires a written text, i.e. all. But if you want to know how the actual text must look like, ask your supervisor for an exceptionally well-written work. It might be hard to abstract from it, but it might give you an idea about the characteristic style that is required. If you want to have a short look at an actual content outline, you can see the first few hundred cells of my dissertation thesis outline on YouTube.
I hope using a content outline can help you putting the complex information, which is the basis of your text, into a coherent structure. Without being overwhelmed by it.
If you have questions, suggestions, and/or ideas, I’d like to hear them. Drop me a line. You can also contact me on my blog at http://organizingcreativity.com
Wonderful post! We will be linking to this particularly great article on our website.
Keep up the good writing.